Yoga is an incredibly effective, low-cost, and trusted practice that offers a wide range of physical and mental benefits.
If your lower back constantly aches throughout the day, gentle Yoga can be a good option to relieve this intense pain and, over time, can even help prevent future back discomfort.
The benefits of Yoga are not limited to physical relief. Slow, controlled movements paired with a focus on deep breathing help reduce stress and ease anxiety and depression. Yoga also addresses the emotional aspects of back pain.
Back Pain

Low back pain can feel like a constant dull ache or a sharp, sudden pain that stops you in your tracks. It might happen immediately, like after an accident or lifting something heavy. Or, it can build up over time as the spine changes with age. For many, the pain sticks around for more than three months (chronic pain). And for about 20% of people, it lasts over a year.
Why Yoga is the Best Option for Back Pain?
Sudden lower back pain is commonly caused by strain on the muscles in the area, which light yoga poses for lower back pain can help relieve and prevent.
Yoga can be particularly beneficial for low back pain by targeting the muscles that support the spine, including the paraspinal muscles that assist in bending the spine, the multifidus muscles that stabilise the vertebrae, and the transverse abdominis in the abdomen, which provides additional spinal support.
Best Yoga Poses to Relieve Lower Back Pain
Yoga has various sub-styles, including Vinyasa, Ashtanga, Yin, Kundalini, and many others. Each offers unique physical and mental well-being approaches and features distinct asanas, each with its own benefits.
One such style, Hatha yoga, is an incredibly effective yoga for lower back pain through its gentle, foundational poses. Let’s learn about the best yoga for back pain here in detail:
1. Standing Forward Bend
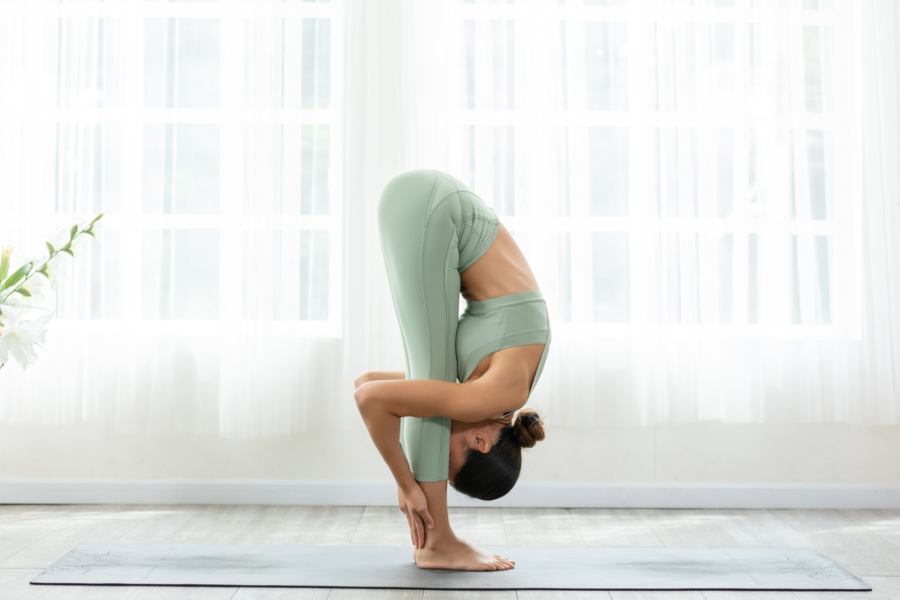
Standing Forward Bend’s Sanskrit name is “Uttanasana,” which means intense stretch. It stretches the back of the legs, hips, and spine, balances the nervous system, and calms the mind. When practised with bent knees, it also relieves tension in the lower back.
How to practice:
- Begin in a Tadasana/Mountain pose. Raise your arms and inhale.
- As you exhale, engage your thighs, pull your belly in and up from the pelvic floor, and bend forward, hinging at the hips.
- Try to reach your hands on the floor, in front of your feet, or you can hold onto the back of your ankles or calves.
- Sit on your heels and press them into the floor. Gently roll the tops of your inner thighs inward.
- Let your head and neck be relaxed and free of tension.
- As you inhale, lengthen your spine. As you exhale, gently soften and deepen into the pose.
2. Downward-Facing Dog
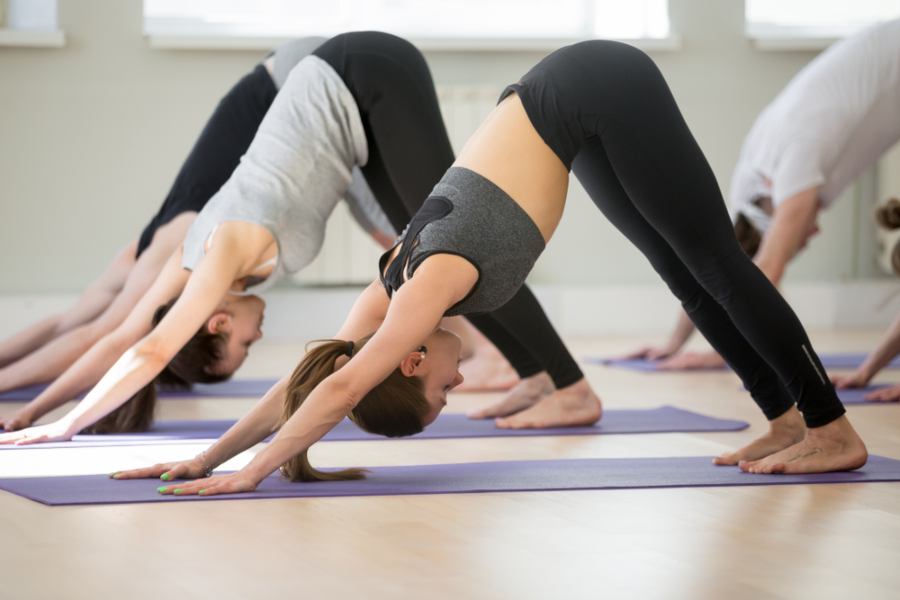
In this pose, your head is lower than your heart, shifting the usual position of your body. Downward dog reverses the usual downward pressure on your spine and gently helps realign your vertebrae. It also helps relieve tension in the neck and back.
How to practice:
- Begin on the floor with your hands shoulder-width apart and shoulders directly over your wrists. Ensure your hips are positioned above or slightly ahead of your knees.
- Extend your spine and press through your hands and feet.
- Lift your hips toward the ceiling and use your arms to help hold your position. Some teachers suggest pulling your shoulder blades down, while others recommend rotating your joints outward for more support.
- Hold the position while breathing deeply. When you’re ready, slowly lower your knees back to the floor to release the pose, or use it as a transition into another pose.
3. Seated Figure Four (Eka Pada Rajakapotasana)
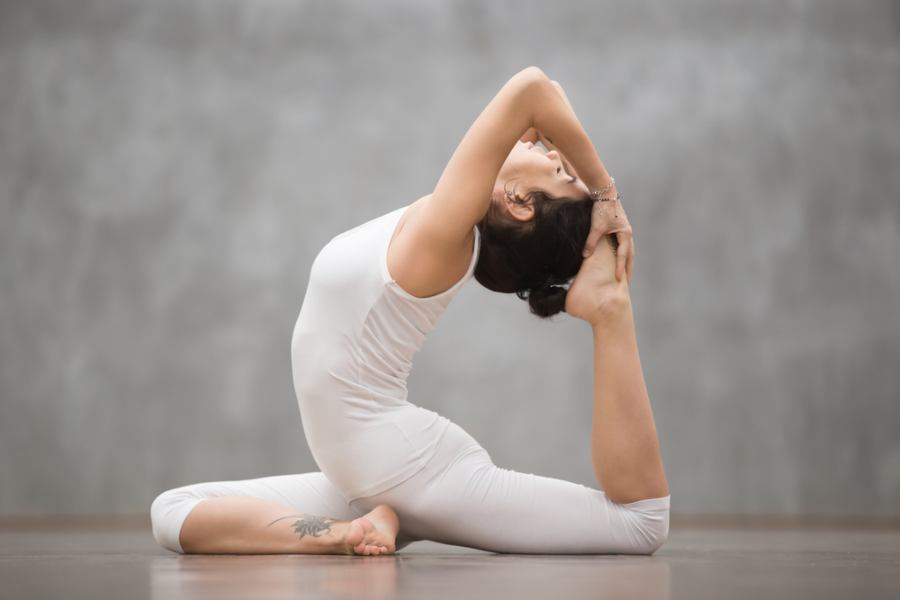
This asana is known in Sanskrit as Eka Pada Rajakapotasana. This helps to relieve stiffness and discomfort in the hips, lower back, and legs, and can also ease sciatic pain.
How to practice:
- Sit calmly upright on the mat with your straight legs and hands on the ground outside your hips for balance.
- Now, put your right ankle above your left knee, bend your left knee until you feel a comfortable stretch in the right hip, and place the sole of your left foot on the floor.
- Hold the stretch for 15-30 seconds, then switch and repeat on the other side.
4. Bridge Pose
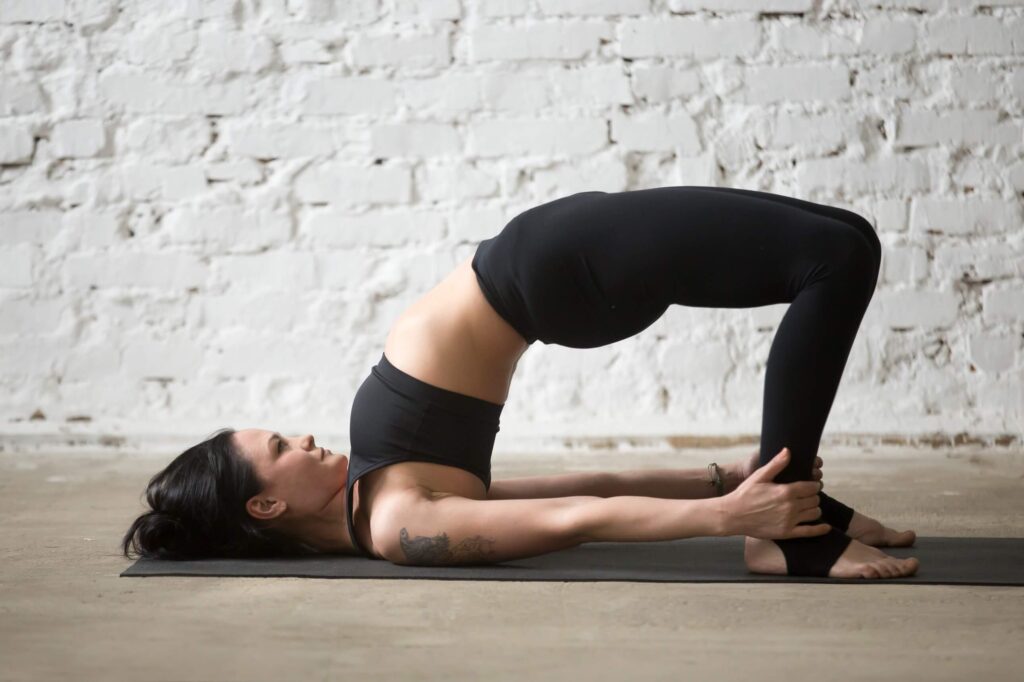
The bridge pose, or Setu Bandha Sarvangasana, opens your chest and hips and increases your back strength. Push your arms into the floor, then lift your hips and chest to make a shape like a small bridge.
By the time you reach Bridge Pose in a Hatha yoga class, your spine is already warm from all the standing poses—it’s like a gentle reward at the end.
How to practice:
- Lie on your back near the border of a traditional yoga mat, with bent knees and feet positioned hip-width apart, separated and parallel.
- Push your feet into the mat and lift your body until it’s straight from your head to your legs.
- Please put your hands together under your body and rest them beside you for support.
- Extend your chest by pulling your shoulder trims down your back and away from your ears.
- Push with your feet and rest your shoulders and neck.
Some Other Beneficial Yoga Poses for Back Pain
1. Child Pose (Balasana)
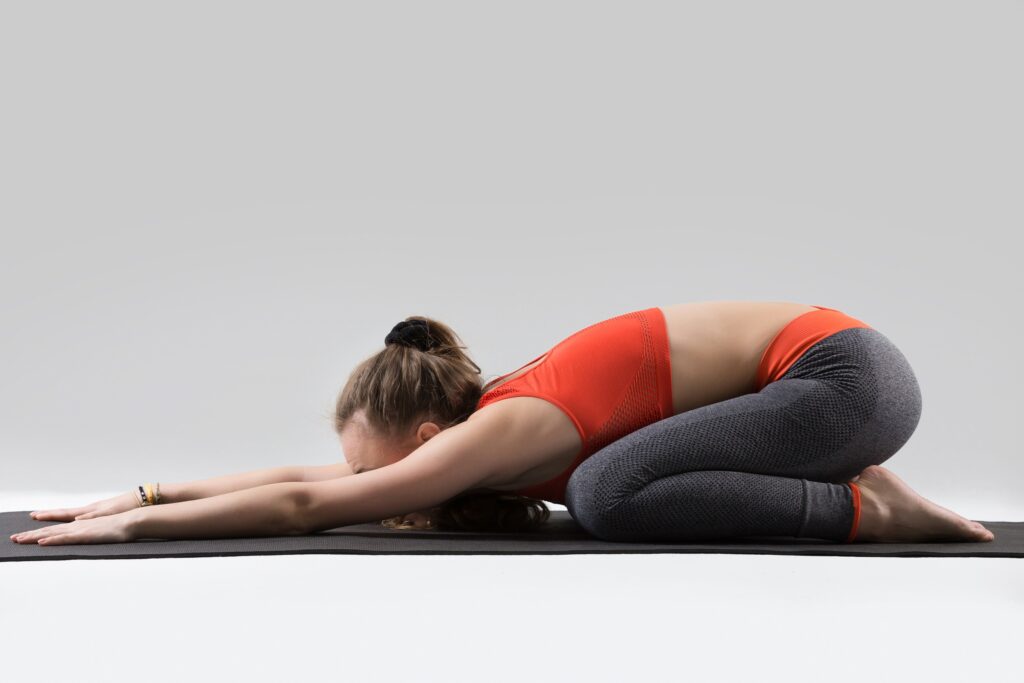
This resting pose’s name comes from the Sanskrit word Balasana. Bala” means child, and asana” means Pose. Child Pose is a forward-bending pose that stretches the thighs and back. It also helps calm nerves and ease stress and tiredness.
How to practice:
- Sit on your heels calmly, with your big toes touching the ground, and your knees slightly apart
- While sitting on your hills, bend your upper body forward, and lower your forehead to the floor
- Keep your arms by your sides and put your hands on the floor, palms facing up
- Gently push your chest against your thighs
- Keep breathing in this resting position, calmly
- During inhalation, slowly raise your stomach, straightening your spine, one vertebra at a time, and then carefully roll it up until you’re sitting up.
2. Cat-Cow Pose
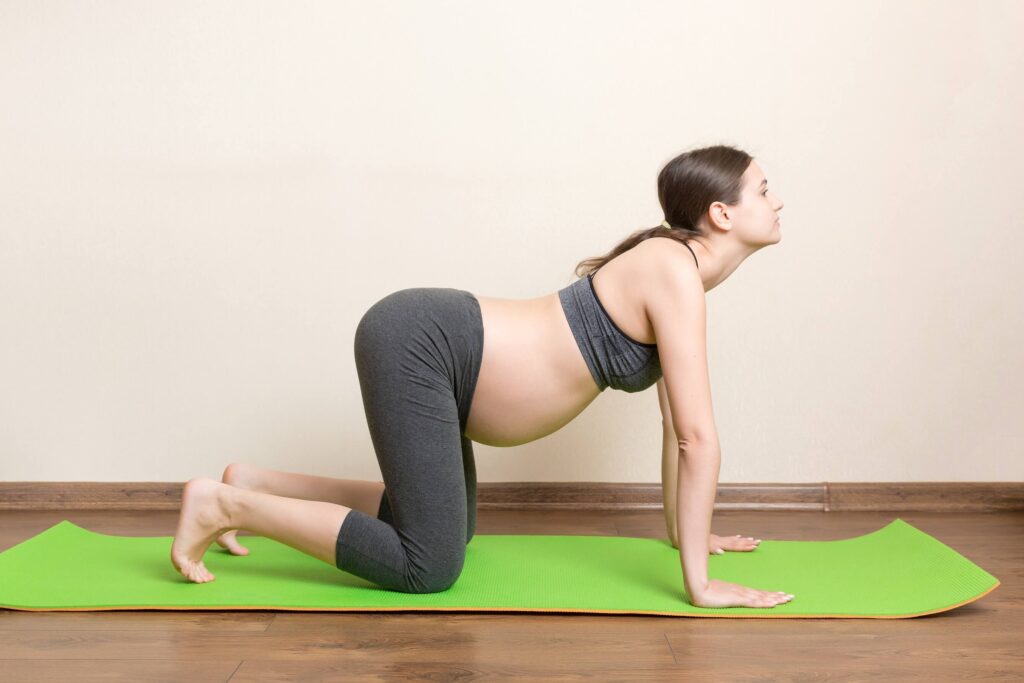
The Cat-Cow Stretch takes your spine from a rounded shape to a gentle arch. Its movement goes with your breath, letting each inhale or exhale guide you.
This pose is usually used for warming up, relaxation, or even to help prevent back pain.
How to practice:
- Like its name, be in a cat or cow position, like hands and knees on the floor.
- Now, imagine your spine as a straight line that links your shoulders to your hips.
- You need to think of a line stretching through the top of your head and back through your tailbone. This is your neutral spine. Keep your neck extended by looking down and out.
3. Pigeon Pose
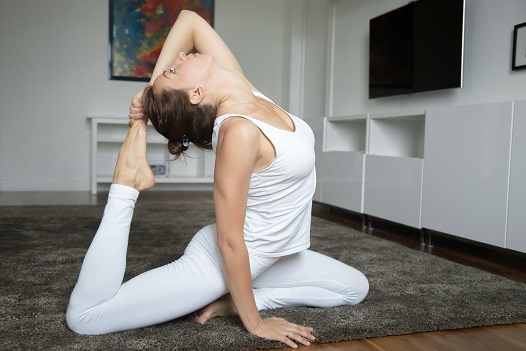
Pigeon pose has numerous variations, each with different benefits. The basic pigeon pose, or Eka Pada Rajakapotasana, helps open your hips and eases back pain.
It can also be a great way to increase flexibility and stretch your muscles; however, performing the move correctly is essential to prevent injury or strain.
How to practice:
- Be in a cat-cow pose. Depending on your body’s flexibility, bring your right knee towards your wrist. It may be just behind your wrist or on its outer or inner edge.
- Find your best position to stretch your outer hip without any discomfort in the knee.
- Your right ankle position will be in front of your left hip area.
- Slide your left leg straight back behind you, keeping your toes pointed down. Your heel should face the ceiling as you extend your leg.
- Pull your legs in towards each other as if you’re bringing your hips together. If needed, place something under your right buttock to keep your hips level.
- With your ach inhaling, try to come onto your fingertips, maintain your spine, pull your belly button, and lift your chest.
- And during exhalation, place your hands forward and gently lower your upper body toward the floor. After that, you can rest your forearms and forehead on the floor.
- Stay here for at least 5 breaths or longer.
- With each exhale, try to release the tension in your right hip.
- To leave the pose, push back via the hands, lift your hips, and move your leg back onto all fours. Repeat on the other side.
4. Low Cobra Pose
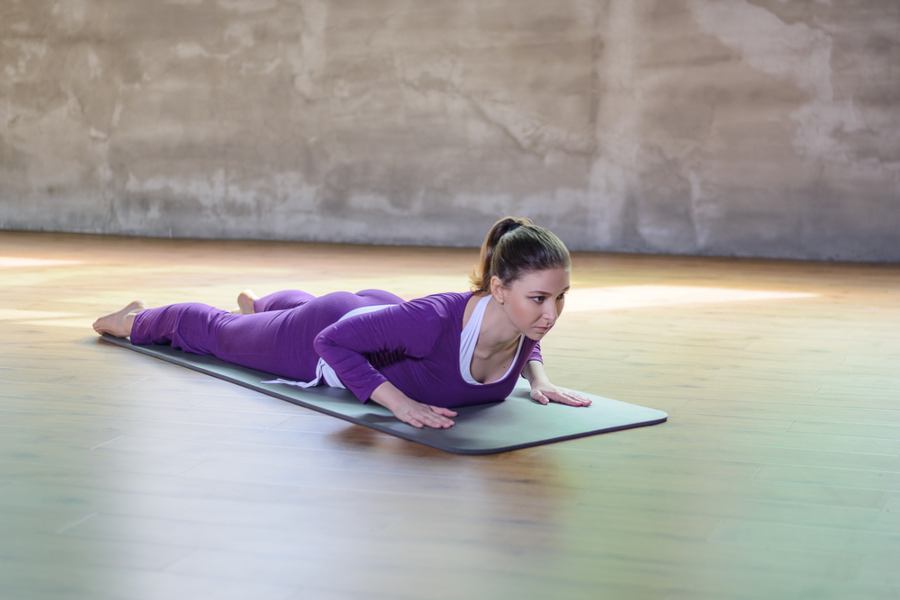
Low Cobra Pose has the unique ability to strengthen and revive the back of the body. Although it is a beginner-level pose, it is highly beneficial for yogis of all levels.
The low cobra pose also stretches the chest and abdomen and works best for the quads and glutes.
How to practice:
- Lie on your stomach with your forehead resting on the floor and your legs extended.
- Place your palms flat on the floor, right under your shoulders, keeping your elbows close to your body.
- Set your legs from the thighs to the toes. Press your feet into the mat, which will lift your kneecaps away.
- Engage your glutes and press down to land your pelvis on the floor.
- On inhalation, gently lift your chest off the floor as high as you can.
- Do not press with your hands to raise your chest higher; use your back muscles instead.
- Knit your lower ribs together to prevent flaring, and move your shoulders down your back away from your ears as you hug your shoulder blades toward the midline on your back.
- Lower your forehead to the floor on each exhalation and repeat the process. Let your movements flow on your breath like waves.
- Doing three or four in a row is nice, as each successive lift brings you higher. You can also experiment with holding the pose for several breaths instead of lowering it on the next exhale.
These are the best yoga poses to ease back pain if practised under professional guidance. However, you can perform them at home by following the proper instructions.

200 Hour Yoga Teacher Training in Rishikesh || 300 Hour Yoga Teacher Training in Rishikesh
What goes wrong?
Because yoga is still a physical exercise involving stretching, muscle pressing, and movements like any other exercise, it can lead to injuries, especially in the back. As Dr. Elson explains, most problems happen when people skip the proper form or rush through poses instead of easing into them slowly.
It’s like jerking your body while lifting a dumbbell, rushing through reps instead of moving slowly and carefully. Or running on a treadmill at full speed without gradually picking up the pace. This kind of rushing increases the risk of injury.
Yoga helps to create a strong base by using targeted muscles, then moves slowly to stretch and lengthen your body. For example, in a seated spinal twist, which helps with lower back pain, the goal isn’t to twist quickly or as much as you can, but to move gently and carefully.
Conclusion
Yoga can be highly beneficial for low back pain by enhancing the flexibility of the muscles that support the spine. Yoga helps to release tension in the back muscles, such as the paraspinal muscles that assist in bending the spine, the multifidus muscles that stabilise the vertebrae, and the transverse abdominis in the abdomen, which provides additional spinal support.
Last Modified Date: 01st Oct 2025


