Surya Namaskar: The 12 Poses of Sun Salutation, Step by Step
Table of Contents
- What Is Surya Namaskar? (And Why It’s So Much More Than a Warm-Up)
- Before You Begin: Important Preparation Notes
- The 12 Poses of Sun Salutation
- Step 1: Pranamasana (Prayer Pose)
- Step 2: Hasta Uttanasana (Raised Arms Pose)
- Step 3: Hasta Padasana (Standing Forward Fold / Hand-to-Foot Pose)
- Step 4: Ashwa Sanchalanasana (Equestrian Pose / Low Lunge) — Right Leg Back
- Step 5: Phalakasana (Plank Pose)
- Step 6: Ashtanga Namaskara (Eight-Limbed Salutation)
- Step 7: Bhujangasana (Cobra Pose)
- Step 8: Adho Mukha Svanasana (Downward-Facing Dog)
- Step 9: Ashwa Sanchalanasana (Equestrian Pose) — Left Leg Forward
- Step 10: Hasta Padasana (Standing Forward Fold)
- Step 11: Hasta Uttanasana (Raised Arms)
- Step 12: Tadasana (Mountain Pose)
- Breathing Pattern: The Complete Summary
- How Many Rounds Should You Do?
- The 12 Surya Namaskar Mantras (For Deeper Practice)
- Health Benefits of Daily Surya Namaskar Practice
- Physical Benefits:
- Mental & Emotional Benefits:
- Who Should Be Cautious (Or Avoid)
- 5 Mistakes That Prevent Beginners From Getting Results
- Conclusion
- FAQs About Suryanamaskar
- What is Surya Namaskar and what does it mean?
- How many calories does Surya Namaskar burn?
- Can I do Surya Namaskar every day?
- What is the difference between one round and one cycle of Surya Namaskar?
- Is Surya Namaskar good for weight loss?
- Can beginners do Surya Namaskar?
- What is the correct breathing pattern in Surya Namaskar?
- What happens if you do 108 rounds of Surya Namaskar?
- Can Surya Namaskar replace a gym workout?
- Who should not do Surya Namaskar?
I’ve been teaching Surya Namaskar on the banks of the Ganges in Rishikesh for many years, and not a single class goes by without at least one student asking the same question: ‘Am I breathing correctly?’ That question always makes me smile — because it means they’re paying attention. Surya Namaskar isn’t just a warm-up. It’s a quiet, twelve-pose conversation between movement and breath, repeated until the body learns to flow with the mind. In this guide, we’ll walk through the twelve poses together, gently.
Most people who come to this guide want one of two things: either they are a complete beginner who has heard about Sun Salutation and wants to understand it properly, or they have been practising for a while, and something is not quite clicking. Both are the right reasons to be here. What follows is everything you need to practise Surya Namaskar correctly, the steps, the breath, the purpose behind each posture, the mantras, and the mistakes that quietly prevent most beginners from getting results.
What Is Surya Namaskar? (And Why It’s So Much More Than a Warm-Up)
Most people encounter Surya Namaskar as a warm-up at the start of a yoga class. But in traditional Hatha and Ashtanga yoga, it’s considered a complete practice in itself.
The name comes from Sanskrit: ‘Surya’ (सूर्य) means ‘sun’, and ‘Namaskar’ (नमस्कार) means ‘salutation’ or ‘greeting’. Practised at sunrise facing the east, it’s a ritual of gratitude to the sun – the source of all life and energy on this planet.
The 12 postures are not random. Each one corresponds to one of the 12 solar cycles of the year, and each is associated with a Surya Beeja Mantra — a sacred seed sound that deepens the meditative quality of the practice. This is why, when you practise with awareness, Surya Namaskar feels qualitatively different from just “doing 12 poses”.
Physically, it’s a full-body workout. You’re bending forward, arching backward, building core strength, opening the chest, stretching the hamstrings, and increasing spinal flexibility, all within a single flowing sequence that takes less than two minutes per round.
The science backs this up, too. Research published in the International Journal of Yoga has found that regular Surya Namaskar practice improves cardiovascular endurance, muscular strength, and flexibility simultaneously — benefits that typically require separate training modalities in conventional exercise
Before You Begin: Important Preparation Notes
At Rishikul Yogshala, we always tell our students: preparation is part of the practice. Before you step onto your mat:
- Practice on an empty stomach. Ideally, wait 3–4 hours after a meal. Early morning, before breakfast, is the traditional and most effective time.
- Face east. Traditional practice is done facing the rising sun. Even indoors, orient yourself eastward if possible.
- Do a brief warm-up. Gentle neck rolls, shoulder circles, and ankle rotations prepare your joints and reduce injury risk.
- Use a good mat. On smooth or slippery surfaces, your palms and feet need grip — especially in Adho Mukha Svanasana and Phalakasana.
- Know when NOT to practise. Avoid Surya Namaskar if you have recent wrist, knee, or lower back injuries, are in the first trimester of pregnancy, or are menstruating heavily. Consult a doctor if you have high blood pressure or a heart condition.
The 12 Poses of Sun Salutation
Let’s discuss in detail the 12 sun salutation poses.
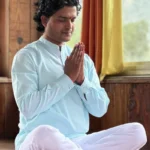
Step 1: Pranamasana (Prayer Pose)
Steps:
- Stand and keep your legs together to balance your weight equally on them.
- Relax your shoulders and expand your chest.
- Inhale while you bring your hands above from the sides.
- Exhale when you join your hands in a namaskar.

Benefits:
- Relaxes the nervous system
- Balances the body
- Establishes calmness, concentration, gratitude, and humility
Common mistake: Holding tension in the shoulders. Let them drop away from your ears. Your chest should feel open, not collapsed.
Step 2: Hasta Uttanasana (Raised Arms Pose)
Steps:
- Lift your arms above your head by keeping your biceps close to your ears and inhaling.
- Stretch your whole body by pushing the pelvis forward.
- Do not try to bend backwards, but try to reach up with your fingers

Benefits:
- Expands your chest
- Stretches your spinal cord, arms, and intestinal and abdominal muscles.
Common mistake: Compressing the lower back. Keep your core lightly engaged so the backbend is distributed through the whole spine, not just the lumbar region.
Step 3: Hasta Padasana (Standing Forward Fold / Hand-to-Foot Pose)
Steps:
- While breathing out, bend downwards by keeping your spine erect.
- Touch the ground beside your feet with your palms. You may bend your knees while touching the ground.
- If you can deepen the stretch, straighten your knees.

Benefits:
- Opens the shoulders and hips
- Stretches back muscles and spine
- Tones your legs, thighs, and abdomen
Common mistake: Rounding aggressively through the upper back while the lower back stays stiff. Instead, try to keep the spine lengthening on the way down, folding from the hip joints rather than the waist.
Step 4: Ashwa Sanchalanasana (Equestrian Pose / Low Lunge) — Right Leg Back
Steps:
- Stretch your right leg back as much as possible and breathe in.
- Keep your right knee on the ground and look up.
- The left leg stays bent with the foot between your palms.

Benefits:
- Improves sciatica, constipation, and indigestion
- Makes your neck and spine flexible
- Tones your legs, thighs, and abdomen
Common mistake: Letting the front knee cave inward or extend beyond the ankle. Keep it directly stacked.
Step 5: Phalakasana (Plank Pose)
Steps:
- Breathe in and stretch your left leg backward, too.
- Stretch your whole body in a straight line with your arms perpendicular to the ground.
Benefits:
- Calms the mind
- Improves posture
- Good for the spine
- Strengthens your abdominal muscles, back, and arms
Common mistake: Letting the hips sag (overloading the lower back) or piking too high. Find the straight-line position and hold it with intention.

Step 6: Ashtanga Namaskara (Eight-Limbed Salutation)
Steps:
- Exhale and gently touch your knees on the ground.
- Protrude your hips slightly and slide forward.
- Rest your chin and chest on the floor while your posterior is raised.
- Remember, the abdomen should not be on the floor.

Benefits:
- Reduces anxiety and tension
- Enhances the flexibility in your spine and back
- Strengthens your chest, back, arms, shoulders, and nerves
Common mistake: Collapsing the whole body flat like a push-up. Remember — abdomen stays off the floor.
Step 7: Bhujangasana (Cobra Pose)
Steps:
- Slide forward from the Ashtanga Namaskara pose and lie your legs flat on the ground.
- Raise your chest high with your elbows bent and shoulders away from your ears.
- Inhale and gently push your chest forward.
- Exhale and gently push your navel down.
- Keep your toes flat on the floor.

Benefits:
- Strengthens your heart, entire upper body, and abdominal and back muscles
- Elevates your mood
- Relieves constipation and menstrual irregularities
- Tones your liver, uterus, and ovaries
- Benefits the kidneys and adrenal glands
Common mistake: Crunching the neck backward. Keep your neck long and in line with the rest of your spine.
Step 8: Adho Mukha Svanasana (Downward-Facing Dog)
Steps:
- Breathe out while lifting your tailbone and hips in an inverted V position.
- Try to keep your heels on the ground to deepen this Sun salutation step.

Benefits:
- Increases blood flow to the head and brain
- Cures issues with the spine
- Stretches your abdominal, back, and arm muscles
Common mistake: Rounding the upper back to get the heels down. Instead, keep the spine long and let the heels be wherever they are. Long spine over flat heels, always.
Step 9: Ashwa Sanchalanasana (Equestrian Pose) — Left Leg Forward
Steps:
- Bring your right foot forward and lower your back.
- Keep your right foot between your two palms, lying flat on the floor.
- Press your hips down, the right calf perpendicular to the ground, and look straight.
- To deepen the stretch, gently push the hips downwards.

Benefits:
- Improves sciatica, constipation, and indigestion
- Makes your neck and spine flexible
- Tones your legs, thighs, and abdominal muscles
What it does for your body: Same benefits as Step 4 — hip flexor opening, spinal flexibility, digestive stimulation — now mirrored to the left side.
Step 10: Hasta Padasana (Standing Forward Fold)
Steps:
- Bring the stretched right leg forward and raise your hips to get on your feet.
- But keep the palms flat on the ground beside your feet. You may bend your knees if the stretch is too deep for you.
- Try to touch your nose to your knees and keep breathing

Benefits:
- Opens the shoulders and hips
- Stretch your back muscles and spine
- Tones your legs, thighs, and abdominal muscles
Step 11: Hasta Uttanasana (Raised Arms)
Steps:
- Lift your torso from the Hasta Padasana Sun salutation step and stretch your body backward.
- Keep your arms stretched backward, too.
- Push your hips slightly outwards and keep your biceps near your ears.

Benefits:
- Opens your shoulders and hips
- Stretch your back muscles and spine
- Tones your legs, thighs, and abdominal muscles
Common mistake: Coming up with a flat, stiff spine. Let the movement be fluid and wave-like, rising from the tailbone through the crown.
Step 12: Tadasana (Mountain Pose)
Steps:
- Exhale and lower your arms to your sides.
- Relax and observe your body sensations

Benefits:
- Relaxes the nervous system
- Balances the entire body
Breathing Pattern: The Complete Summary
The breath is what separates Surya Namaskar from a series of stretches. Here’s the complete guide at a glance:
| Step | Pose | Breath |
| 1 | Pranamasana | Exhale |
| 2 | Hasta Uttanasana | Inhale |
| 3 | Hasta Padasana | Exhale |
| 4 | Ashwa Sanchalanasana | Inhale |
| 5 | Phalakasana | Hold / Inhale |
| 6 | Ashtanga Namaskara | Exhale |
| 7 | Bhujangasana | Inhale |
| 8 | Adho Mukha Svanasana | Exhale |
| 9 | Ashwa Sanchalanasana | Inhale |
| 10 | Hasta Padasana | Exhale |
| 11 | Hasta Uttanasana | Inhale |
| 12 | Tadasana | Exhale |
The general rule: inhale when you open or expand, exhale when you fold or contract. Once this pattern becomes intuitive, the sequence flows like a moving meditation.
How Many Rounds Should You Do?
This is one of the most common questions we hear at the school, and the honest answer is: it depends on your goal.
- For general health and energy: 6–12 rounds daily (3–6 on each side)
- For weight management: 12–24 rounds
- For athletic conditioning: Up to 108 rounds (a traditional number in yogic practice, reserved for experienced practitioners)
- For beginners: Start with 3–4 rounds and increase gradually over weeks, not days
One round of Surya Namaskar burns approximately 13–14 calories on average. But calorie count misses the point. The real benefit is systemic, hormonal regulation, nervous system balance, improved digestion, and mental clarity, none of which shows up in a calorie tracker.
The 12 Surya Namaskar Mantras (For Deeper Practice)
Each of the 12 positions corresponds to a Sanskrit mantra and a solar deity. Chanting or mentally reciting these mantras transforms the physical practice into a meditative ritual:
- Om Mitrāya Namaha — Salutation to the friend of all
- Om Ravaye Namaha — Salutation to the shining one
- Om Sūryāya Namaha — Salutation to the one who induces activity
- Om Bhānave Namaha — Salutation to the one who illumines
- Om Khagāya Namaha — Salutation to the one who moves through the sky
- Om Pūṣṇe Namaha — Salutation to the giver of strength
- Om Hiraṇyagarbhāya Namaha — Salutation to the golden cosmic self
- Om Marīcaye Namaha — Salutation to the rays of the sun
- Om Ādityāya Namaha — Salutation to the son of Aditi
- Om Savitre Namaha — Salutation to the stimulating power of the sun
- Om Arkāya Namaha — Salutation to the one who is fit to be praised
- Om Bhāskarāya Namaha — Salutation to the one who leads to enlightenment
You don’t need to chant these aloud. Even a silent, internal awareness of each mantra as you move through the pose adds a profound dimension to the practice.
Health Benefits of Daily Surya Namaskar Practice
Practised consistently, Surya Namaskar delivers benefits that are difficult to achieve through any single gym exercise or yoga style alone:
Physical Benefits:
- Builds full-body strength (arms, core, legs, back) simultaneously
- Improves spinal flexibility and posture — particularly important for those with desk jobs
- Supports healthy weight management through improved metabolic rate
- Stimulates the lymphatic system, supporting detoxification
- Regulates hormonal function, including thyroid and adrenal health
- Improves cardiovascular endurance over time
Mental & Emotional Benefits:
- Reduces cortisol (stress hormone) levels
- Improves focus and mental clarity — largely through the breath-movement synchronisation
- The rhythmic, repetitive nature creates a meditative, calming effect on the nervous system
- Consistent practice is associated with reduced symptoms of anxiety and mild depression
In Ayurvedic terms, Surya Namaskar is said to balance all three doshas, Vata, Pitta, and Kapha, making it one of the few practices considered universally beneficial regardless of body constitution.
Who Should Be Cautious (Or Avoid)
Surya Namaskar is broadly safe, but it’s not for everyone in all circumstances:
- Pregnancy: Avoid from the second trimester onward, or practice modified versions under expert guidance
- Lower back problems: The forward folds and backbends require modification; work with a qualified teacher
- Wrist injuries: Weight-bearing on the wrists in Plank and Cobra can aggravate carpal tunnel syndrome or wrist strains
- High blood pressure or glaucoma: The inversions (Downward Dog, forward folds) involve increased blood flow to the head — consult your doctor
- Hernia: The abdominal engagement in several poses is contraindicated
When in doubt, always consult both a medical professional and a qualified yoga teacher before beginning any new practice. This is especially important if you’re dealing with a chronic condition.
5 Mistakes That Prevent Beginners From Getting Results
After teaching hundreds of international students at our school in Rishikesh, these are the five mistakes I see most often:
1. Rushing through the poses. Surya Namaskar, done fast, becomes aerobic exercise. That’s not bad, but you lose the meditative and therapeutic depth. Slow down, especially in the first few weeks.
2. Disconnecting breath from movement. This is the single most important element of the practice. If you lose the breath-movement link, you’re doing yoga aerobics, not yoga. Keep coming back to the breath.
3. Skipping the transition poses. Ashtanga Namaskara and Tadasana are often glossed over. They matter. Each pose in the sequence has a purpose.
4. Practising with pain. A stretch sensation is normal. Sharp or acute pain is not. Never push into pain, especially in the lower back, knees, or wrists.
5. Inconsistency. Five minutes of Surya Namaskar every single day is infinitely more beneficial than an intense session once a week. The body responds to regularity.
Conclusion
There is something irreplaceable about learning Surya Namaskar in Rishikesh, the world’s yoga capital, nestled in the Himalayas where the Ganges emerges from the mountains. Practising Sun Salutation at sunrise by the river, with the sound of temple bells in the distance, is an experience that changes how you understand the practice.
At Rishikul Yogshala Rishikesh, Surya Namaskar is a foundational element of every course we teach, from our 200 hour yoga teacher training to our 500-hour professional programmes. Our teachers, registered with Yoga Alliance and trained in traditional Hatha and Ashtanga lineages, guide students through not just the physical form but also the breathwork, philosophy, and meditative dimensions of the practice.
If you’re ready to go deeper, our 200-Hour Yoga Teacher Training is the most comprehensive way to understand and teach Surya Namaskar and the full spectrum of yoga.

FAQs About Suryanamaskar
What is Surya Namaskar and what does it mean?
Surya Namaskar means salutation to the sun. It is a sequence of 12 yoga poses performed in a flowing order, each linked to a specific breath. Practised at sunrise facing east, it is both a complete physical workout and a meditative ritual with roots in ancient Vedic tradition
How many calories does Surya Namaskar burn?
One round of Surya Namaskar burns approximately 13 to 14 calories. At 12 rounds daily you burn roughly 150 to 170 calories — but the deeper benefits go beyond calorie count, including hormonal regulation, improved digestion, and nervous system balance.
Can I do Surya Namaskar every day?
Yes — and consistency is where the real benefit comes from. Five minutes of daily Surya Namaskar is more beneficial than an intense session once a week. The body responds to regularity, not occasional effort.
What is the difference between one round and one cycle of Surya Namaskar?
One complete cycle of Surya Namaskar consists of two rounds — one starting with the right leg and one with the left. Each round has 12 poses. So one full cycle is 24 poses in total.
Is Surya Namaskar good for weight loss?
es, when practised consistently and at a steady pace. 12 to 24 rounds daily supports healthy weight management by improving metabolic rate, stimulating the lymphatic system, and regulating hormonal function — particularly thyroid and adrenal health.
Can beginners do Surya Namaskar?
Yes. Start with 3 to 4 rounds, focus entirely on breath and alignment, and increase gradually over weeks. Bending the knees in forward folds and skipping the full backbend in Cobra are simple modifications that make the practice accessible from day one.
What is the correct breathing pattern in Surya Namaskar?
The general rule is inhale when you open or expand the body, exhale when you fold or contract. Inhale in Raised Arms, Equestrian, Cobra and Raised Arms again. Exhale in Prayer, Forward Fold, Plank to Eight-Limbed, Downward Dog, Forward Fold, and Mountain Pose.
What happens if you do 108 rounds of Surya Namaskar?
108 is a sacred number in yogic tradition and completing 108 rounds is considered a deeply purifying practice. It is reserved for experienced practitioners — the physical demand is significant and the practice is traditionally done on specific occasions such as solstices and equinoxes.
Can Surya Namaskar replace a gym workout?
For general fitness, yes. Research published in the International Journal of Yoga shows that regular Surya Namaskar improves cardiovascular endurance, muscular strength, and flexibility simultaneously — benefits that typically require separate training modalities in conventional exercise. It will not replace heavy strength training but is a complete workout for most people.
Who should not do Surya Namaskar?
People with recent wrist, knee, or lower back injuries should modify or avoid it. It is also contraindicated from the second trimester of pregnancy onward, during heavy menstruation, and for those with high blood pressure, glaucoma, or hernia — the inversions and abdominal engagement can aggravate these conditions. Always consult a doctor and a qualified yoga teacher if you have any chronic condition.