








Virasana (Hero Pose): Steps, Benefits & Safety Tips
Table of Contents
- What Is Virasana (Hero Pose)?
- A Note on History
- Preparatory Poses
- How to Do Virasana: Step by Step
- Key Alignment Tips
- Common Mistakes to Avoid
- 8 Benefits of Veerasana Yoga Pose
- Variations
- Who Should Avoid Virasana
- Virasana vs Vajrasana: What’s the Difference?
- Conclusion
- Frequently Asked Question
- What is Virasana in English?
- What is the difference between Virasana and Vajrasana?
- Is Virasana bad for your knees?
- How long should I sit in Virasana?
- Can beginners do Virasana?
- Can I do Virasana after eating?
- What is Supta Virasana?
- Who should not do Virasana?
Virasana, also spelled Veerasana and known in English as Hero Pose, is a kneeling posture that is often used for meditation and pranayama. You sit on the floor between your heels with your knees together and your spine tall.
It looks simple, but it asks for open knees, ankles, and thighs. With the right props, almost anyone can practise it safely. In this guide, we’ll go through the steps, alignment tips, benefits, variations, and who should avoid it.
Virasana at a Glance
| Sanskrit name | Virasana (also spelled Veerasana) |
| English name | Hero Pose |
| Pronunciation | veer-AH-suh-nuh |
| Pose type | Seated, kneeling |
| Level | Beginner (with props) to intermediate |
| Hold time | 30 seconds to 5 minutes |
| Stretches | Thighs (quadriceps), knees, ankles, tops of the feet |
| Best for | Meditation, pranayama, posture |
| Props | Yoga block, bolster, folded blanket |
| Avoid if | Knee or ankle injury, recent knee surgery |
Key Takeaways
- Virasana (Hero Pose) is a kneeling pose where you sit on the floor between your feet.
- It stretches the thighs, knees, and ankles and supports an upright spine.
- It is a steady seat for meditation and pranayama.
- Beginners should sit on a block or bolster to protect the knees.
- Avoid it if you have a knee or ankle injury.
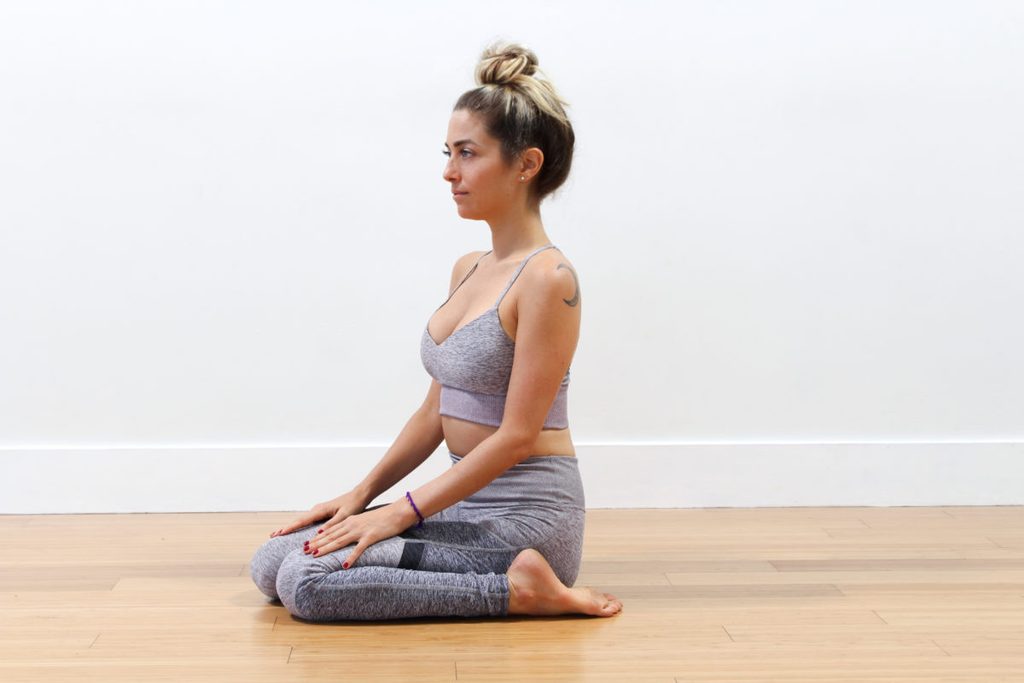
What Is Virasana (Hero Pose)?
Virasana (Hero Pose) or Veerasana is a seated yoga pose where you kneel with your knees together and sit on the floor between your feet. It stretches the thighs, knees, and ankles, supports an upright spine, and is a common seat for meditation and breathing practice.
The name comes from two Sanskrit words:
- Vira means hero or warrior
- Asana means seat or pose
So Virasana means “hero’s seat.” The name suggests the calm, steady strength of a warrior sitting still before action.
A Note on History
The name Virasana is old. The Hatha Yoga Pradipika describes a Virasana, but it is a different seated shape, with one foot placed on the opposite thigh. The kneeling version we practise today became widely known through modern teachers, especially B.K.S. Iyengar in Light on Yoga (1966).

Preparatory Poses
Warm up the thighs, knees, and ankles before you sit in Virasana.
1. Vajrasana (Thunderbolt Pose): Kneel and sit on your heels for 1 to 2 minutes. This gets your knees and ankles used to kneeling before you sit lower between your feet.
2. Anjaneyasana (Low Lunge): Step one foot forward and lower the back knee to the mat. Hold for 5 breaths on each side. This stretches the front of the thighs and hips, which are often tight in Virasana.
How to Do Virasana: Step by Step
The following are the guided steps to carefully practice VirasanaPose:
Step 1: Find A Space
- Choose a peaceful, clean spot where you can sit without being bothered, and use a folded blanket or yoga mat for comfort.
Step 2: Begin in a Kneeling Position
- Your thighs should be perpendicular to the floor when you get on your knees.
- Keep your hips hip-width apart or your knees together, depending on your degree of flexibility.
Step 3: Position Your Feet
- The tops of your feet should be flat on the floor, and they should be slightly wider than your hips.
- Make sure that instead of splaying out to the sides, your big toes are pointed directly back.
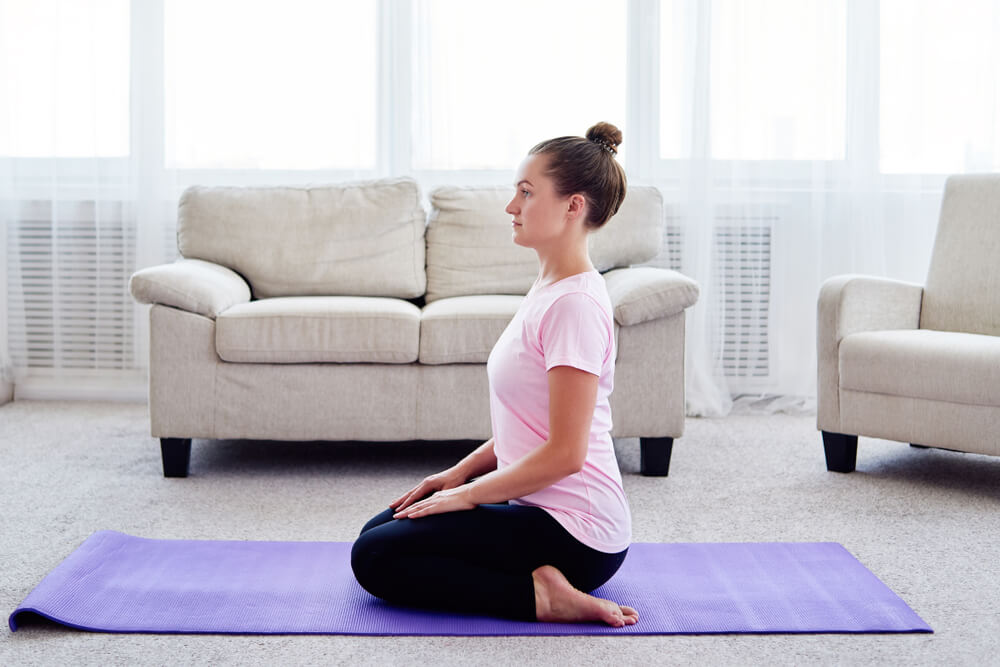
Step 4: Sit Between Your Heels
- Lower your hips slowly until your buttocks are between your heels on the floor.
- If sitting directly on the floor hurts, place a folded blanket, yoga block, or bolster beneath your hips.
Step 5: Align Your Spine
- With your shoulders relaxed and your spine straight, sit up straight.
- Put your hands in a mudra (e. g., on your thighs). A. when meditating (Gyan Mudra).
Step 6: Breathe and Hold
- Inhale evenly and deeply through your nose.
- Increase the duration of the pose to one to five minutes as you get more comfortable doing it.
Also Read: Prasarita Padottanasana: Benefits, Modifications and Variations
Key Alignment Tips
- No knee strain. You should not feel any pain in your knees. If you do, sit higher on a prop.
- Feet point straight back. Keep the tops of your feet flat on the floor. Don’t let them turn outward.
- Keep your back straight. Avoid slouching or arching your lower back.
- Engage your core. Gently drawing your belly in gives the pose balance and support.
- Use padding. Sit on a folded blanket or a proper yoga mat to reduce pressure on your knees and ankles.
Common Mistakes to Avoid
- Forcing the hips to the floor. If your hips don’t reach the floor, that is normal. Use a block and let flexibility come with time.
- Letting the knees spread apart. Keep your knees close together, or no wider than your hips.
- Sitting on the feet. In Virasana, you sit between your feet, not on them. Sitting on your heels is Vajrasana.
- Staying too long too soon. Holding the pose for many minutes on the first day can strain the knees. Build up slowly.

8 Benefits of Veerasana Yoga Pose
1. Stretches the thighs. Sitting between your heels gives a deep stretch to the quadriceps, the big muscles at the front of your thighs.
2. Improves knee and ankle flexibility. With regular, careful practice, the knees and ankles become more comfortable bending fully. This makes other kneeling and seated poses easier.
3. Stretches the tops of the feet. The tops of your feet press into the floor, which gently stretches the ankles and the front of the feet.
4. Supports good posture. Slouching is less likely in Virasana because the pose engages the core muscles and keeps the spine upright.
5. A steady seat for meditation and pranayama. Many students find it easier to keep a straight back here than in cross-legged poses. This makes it a good seat for breathing practice and meditation.
6. Calms the mind. Sitting still with slow, deep breaths encourages relaxation and helps reduce stress.
7. Refreshes tired legs. Many people who stand for long hours find that this pose helps their legs feel lighter afterwards.
8. Prepares you for deeper poses. Virasana builds the flexibility needed for Supta Virasana (Reclining Hero Pose) and other deeper backbends and kneeling poses.
Variations
1. On a block or bolster: Sit on a yoga block or bolster placed between your feet. This is the best option for beginners and anyone with tight knees or thighs.
2. Blanket under the ankles: If the tops of your feet or ankles hurt, place a rolled blanket under the front of your ankles.
3. Supta Virasana (Reclining Hero Pose): From Virasana, lean back slowly onto your forearms, then onto your back. Use a bolster behind you for support. This deeper variation stretches the thighs and the front of the body. Try it only when regular Virasana feels easy.
Who Should Avoid Virasana
Skip this pose, or practise it only with a teacher’s guidance, if you have:
- A knee injury or recent knee surgery
- An ankle injury
- Pain in the knees or ankles while kneeling
- Varicose veins or poor circulation in the legs (don’t stay for long periods)
Note: Before going for the move, you must consult a yoga teacher or healthcare provider if you have any concerns or physical limitations.
Virasana vs Vajrasana: What’s the Difference?
These two poses look similar and are often confused.
| Virasana (Hero Pose) | Vajrasana (Thunderbolt Pose) | |
|---|---|---|
| Where you sit | On the floor, between your feet | On your heels |
| Stretch | Deeper stretch for thighs, knees, and ankles | Gentler, easier for beginners |
| Main use | Meditation, pranayama, thigh stretch | Meditation, and traditionally after meals to help digestion |
| Difficulty | Moderate | Easy |
Conclusion
Virasana is a simple pose that rewards patience. With the right props and regular practice, it becomes a steady, comfortable seat for meditation and a gentle way to keep your knees, ankles, and thighs flexible.
If you want to learn Virasana and other Hatha yoga poses with correct alignment, our 200 Hour Yoga Teacher Training in Rishikesh covers them in depth, with guidance from experienced teachers.
Frequently Asked Question
What is Virasana in English?
Virasana is called Hero Pose in English. It is also spelled Veerasana.
What is the difference between Virasana and Vajrasana?
In Virasana, you sit on the floor between your feet. In Vajrasana, you sit on your heels. Virasana gives a deeper stretch, while Vajrasana is easier for beginners.
Is Virasana bad for your knees?
Not when done correctly. It can strain the knees if you force your hips down. Use a block or blanket under your hips and stop if you feel any knee pain.
How long should I sit in Virasana?
Start with 30 seconds. As you get comfortable, slowly build up to 1 to 5 minutes.
Can beginners do Virasana?
Yes, with props. Sitting on a block or bolster makes the pose safe and comfortable for most beginners.
Can I do Virasana after eating?
Vajrasana is the pose traditionally recommended after meals. Virasana is also a gentle seated pose, but it is best practised on a light stomach.
What is Supta Virasana?
Supta Virasana, or Reclining Hero Pose, is a deeper variation where you lie back from Virasana. It stretches the thighs and the front of the body more.
Who should not do Virasana?
People with knee or ankle injuries, recent knee surgery, or pain while kneeling should avoid it or practise only with a teacher’s guidance.
This article is for general information and is not medical advice. If you have a respiratory or heart condition, are pregnant, or are unsure whether these practices suit you, please speak to your doctor before beginning.

 +91-8433225327,
 Rishikul Yogshala Rishikesh, Narayan Kunj, Jonk Village, Ram Jhula, Swarg Ashram, Rishikesh, Uttarakhand 249304
 By Airway
 By Railway
 By Bus/Cabs