Plank Pose, also known as Phalakasana, is a foundational yoga posture that builds strength, stability, and body awareness. Although it looks simple, holding your body in a straight line on your hands and toes requires coordinated effort from your core, shoulders, arms, and legs.
For beginners, learning the correct alignment is more important than holding the pose for a long time. Small adjustments to your hand placement, hip position, and breathing can make a difference in how comfortably you practise.
This guide covers everything a beginner needs to know: what Plank Pose is, its other names, how to do it step by step, its benefits, common mistakes, easy variations, and who should be careful. It is written for new students and for yoga teachers in training.
What Is Plank Pose?
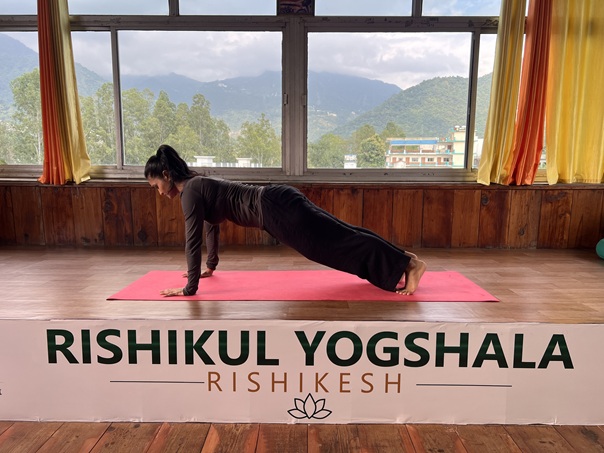
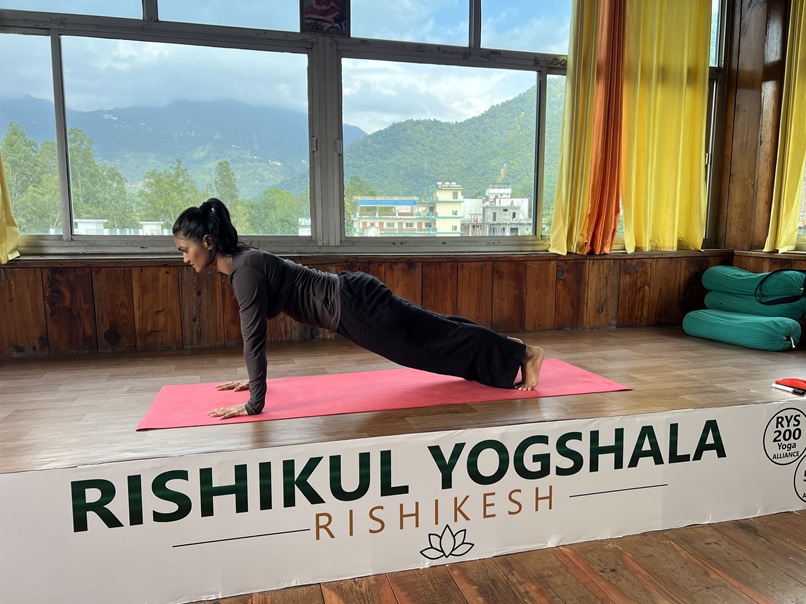
Plank Pose is a beginner-level yoga posture where you hold your body in one straight line from head to heels, supported by your hands and toes, with your arms straight. It looks like the top of a push-up. It strengthens the core, arms, shoulders, and legs, and it appears often in Sun Salutations (Surya Namaskar) and Vinyasa flow classes.
In Sanskrit, Plank Pose is most often called Phalakasana (pronounced pah-lah-KAHS-anna).
Phalaka means “plank” or “board”
Asana means “posture” or “seat”
The name describes the shape exactly: your body should stay as flat and steady as a wooden plank.
Other Names of Plank Pose
Plank Pose goes by several names depending on the yoga school, the teacher, or the book you read. They all describe the same basic shape.
Name
Where You’ll Hear It
Meaning
Phalakasana
Most common Sanskrit name in modern yoga
Plank or board pose
Kumbhakasana
Used by many Indian and Western teachers
Linked to kumbhaka, meaning breath retention
Santolanasana
Bihar School of Yoga and some Hatha traditions
Balancing pose
Utthita Chaturanga Dandasana
Some Ashtanga and Iyengar-influenced classes
Extended four-limbed staff pose
High Plank
Western yoga and fitness classes
Separates it from forearm (low) plank
Full Plank / Push-Up Position
Gyms and fitness training
Top of a push-up
Why is it called Kumbhakasana?Kumbhaka is the yogic term for holding the breath. Some teachers say the name comes from the natural urge to hold the breath while staying strong in the pose. In practice, you should not hold your breath in Plank Pose. Steady, even breathing is the goal.
Phalakasana is a widely used Sanskrit name for Plank Pose in modern yoga. Kumbhakasana and Santolanasana are also used in some yoga traditions, although naming conventions can vary between schools. If you are learning from a particular yoga tradition, follow the terminology used by your teacher or school.
Plank Pose at a Glance
Sanskrit name: Phalakasana
Other names: Kumbhakasana, Santolanasana, High Plank, Utthita Chaturanga Dandasana
Pose type: Arm support, core strengthening
Level: Beginner
Main focus: Core, shoulders, arms, wrists, legs
Hold time for beginners: 15–30 seconds
Found in: Surya Namaskar, Vinyasa, Ashtanga, Power Yoga
Muscles Used in Plank Pose
Plank Pose is a full-body pose. You aren’t moving, but many muscles work together to keep you steady.
Back: erector spinae, the muscles along your spine that keep it long
Shoulders and upper body: deltoids, serratus anterior (along the side ribs), and the chest muscles
Arms: triceps and forearm muscles
Lower body: glutes, quadriceps (front thighs), and calves
Wrists and hands: they carry a large share of your body weight
This is why plank is called a “compound” pose. No single muscle does all the work.
How to Do Plank Pose: Step-by-Step
Take it slowly. Good alignment matters more than how long you hold.
Step 1: Start on All Fours
Come onto your hands and knees in Tabletop Pose. Place your wrists directly under your shoulders and your knees under your hips.
Step 2: Set Your Hands
Spread your fingers wide. Press the whole palm into the mat, especially the base of the index finger and thumb. This takes pressure off the outer wrist.
Step 3: Step Back One Leg at a Time
Tuck your toes under. Step your right foot back, then your left, until your legs are straight. Keep your feet about hip-width apart.
Step 4: Find a Straight Line
Your head, shoulders, hips, and heels should form one long line. Your hips should not sag down or lift high.
Step 5: Engage Your Core
Gently draw your belly button toward your spine. Don’t suck your stomach in hard. Just firm it, as if someone were about to tap your belly.
Step 6: Activate Your Legs
Press back through your heels. Lift your thighs and lightly squeeze your legs toward each other. Strong legs make the pose much lighter on your arms.
Step 7: Keep Your Shoulders Strong
Push the floor away with your hands so your upper back doesn’t sink between your shoulder blades. Keep your shoulders away from your ears.
Step 8: Neck and Gaze
Keep your neck long, in line with your spine. Look at the mat slightly ahead of your hands. Don’t drop your head or crane it up.
Step 9: Breathe and Hold
Breathe slowly through your nose. Hold for 15 to 30 seconds to start. Over a few weeks, build up to 1 minute.
Step 10: Come Out Safely
Lower your knees to the mat. Rest in Child’s Pose (Balasana) for a few breaths.
Quick alignment check: If someone laid a broomstick along your back, it should touch the back of your head, upper back, and tailbone.
Benefits of Plank Pose
Here are the main benefits of Plank Pose, kept realistic and simple.
1. Builds Core Strength
Plank Pose is well known for strengthening the deep and surface muscles of the abdomen. Unlike crunches, it trains your core to stay stable, which is what your core does all day when you stand, walk, lift, or sit.
2. Strengthens Arms, Shoulders, and Wrists
Holding your weight on straight arms builds strength in the triceps, shoulders, and wrists. This prepares you for harder poses like Chaturanga Dandasana, Side Plank (Vasisthasana), and Crow Pose (Bakasana).
3. Supports Better Posture
A strong core and back help support your spine. Over time, regular plank practice can make it easier to sit and stand upright, especially for people who sit at a desk for long hours.
4. Builds Endurance and Stamina
Holding any pose builds muscular endurance. Plank Pose helps you stay strong through longer yoga flows and other physical activities.
5. Improves Balance and Body Awareness
Keeping your body in a straight line teaches you to notice small shifts, like a sagging hip or a sinking chest. This awareness carries into every other pose you practice.
6. May Help Support a Healthy Lower Back
When done with good alignment, core-stability exercises like plank can strengthen the muscles that support the lower back. If you already have back pain, check with a doctor or physiotherapist first, and stop if the pain gets worse.
7. Trains Focus and Patience
When your arms start to shake, your mind wants to quit. Breathing calmly through that moment builds focus and mental steadiness, which is a core part of yoga beyond the physical shape.
8. Needs No Equipment
You can practice Plank Pose anywhere, on a yoga mat, a carpet, or a hotel room floor. It takes very little time to fit into your day.
Common Mistakes in Plank Pose (and How to Fix Them)
Mistake
What Happens
How to Fix It
Sagging hips
Puts strain on the lower back
Firm your belly and lift your thighs
Hips too high
Turns it into a half Downward Dog; core does less work
Lower hips until body is in one line
Shoulders past or behind wrists
Extra stress on wrists and shoulders
Stack shoulders directly over wrists
Sinking chest
Shoulder blades pinch together; upper back collapses
Push the floor away; widen across upper back
Dropping the head
Strains the neck
Look slightly forward; keep neck long
Holding the breath
Raises tension and tires you faster
Breathe slowly and evenly through the nose
Weight on outer wrists
Can cause wrist pain
Press through index finger and thumb
Locked elbows
Pressure on elbow joints
Keep a micro-bend; engage arm muscles
The two most common mistakes are sagging hips and sinking shoulders. Fixing just these two will improve your plank a lot.
Plank Pose Variations for Beginners and Beyond
Easier Variations
1. Knee-Down Plank (Half Plank) Keep the same straight line from head to knees, with knees on the mat. This is the best place to start if the full pose feels too hard.
2. Wall Plank Stand facing a wall and place your hands on it at shoulder height. Walk your feet back until your body is at an angle. Good for people with wrist issues or very low strength.
3. Incline Plank Place your hands on a bench, sturdy chair, or table edge. The higher your hands, the easier the pose.
Moderate Variations
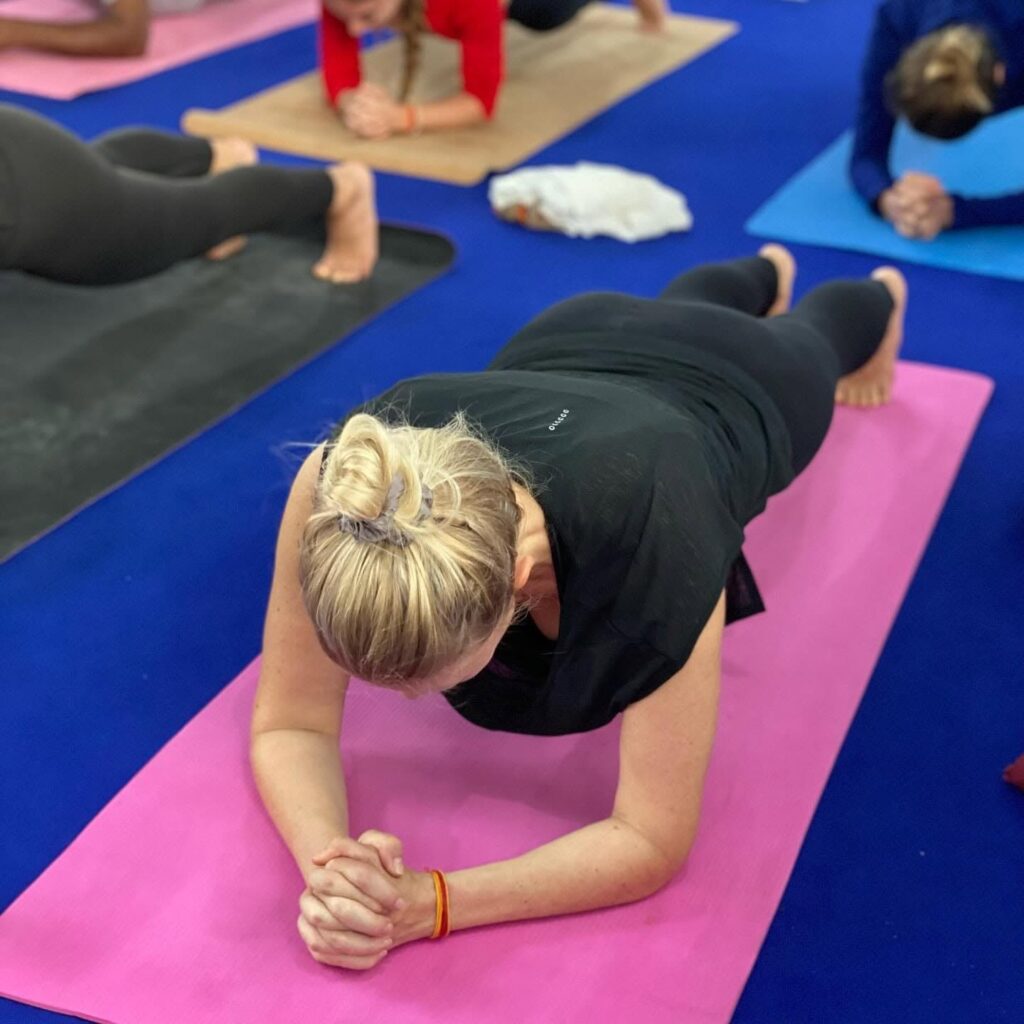
4. Forearm Plank (Low Plank) Lower onto your forearms with elbows under your shoulders. This takes pressure off the wrists but often works the core harder. In yoga, it is sometimes linked to Dolphin Plank.
5. Plank with Shoulder Taps From full plank, slowly tap one hand to the opposite shoulder, then switch. Keep your hips still.
Advanced Variations
6. One-Legged Plank Lift one leg off the floor to hip height. Hold for a few breaths, then switch.
7. Side Plank (Vasisthasana) Turn onto one hand and the outer edge of one foot, stacking your body sideways. This strongly works the obliques and shoulders.
8. Plank to Chaturanga From plank, slowly lower halfway down with elbows close to your ribs. This is how plank links into Chaturanga Dandasana in Sun Salutations.
Props You Can Use
Folded blanket: under the knees in half plank, or under the heels of the hands for sensitive wrists
Yoga blocks: hold blocks or dumbbells instead of placing palms flat to keep wrists straighter
Yoga strap: looped around the upper arms just above the elbows to keep them from splaying out
Wall: for wall plank, or press your feet into it to feel the action of the legs
Precautions: Who Should Be Careful?
Plank Pose is safe for most healthy people, but avoid it or modify it if you have:
Wrist injuries or carpal tunnel syndrome: try forearm plank or wall plank
Shoulder injuries or recent shoulder surgery
Severe lower back pain: get advice from a doctor or physiotherapist first
High blood pressure: keep holds short, breathe steadily, and never hold your breath
Pregnancy: practice only with a qualified prenatal yoga teacher and your doctor’s approval. Later in pregnancy, wall or incline plank is usually more comfortable. Pressure on the abdomen and the risk of diastasis recti (abdominal separation) are things to discuss with a professional.
Recent abdominal surgery or hernia
Stop right away if you feel sharp pain, dizziness, or numbness in your hands.
Cobra Pose (Bhujangasana) or Upward-Facing Dog for a gentle backbend
Downward-Facing Dog to stretch the back body
Wrist stretches with fingers pointing toward you
Plank Pose in Surya Namaskar
Plank Pose is a key part of Sun Salutation sequences. In many Vinyasa-style versions, you move from Downward-Facing Dog → Plank → Chaturanga → Upward-Facing Dog. Some traditional Hatha versions go straight from a lunge into plank, then lower to Ashtanga Namaskara (eight-limbed salute).
Because it appears so often, a weak or misaligned plank can cause wrist and shoulder strain over many rounds. Learning to do it properly early on protects your body throughout your practice.
Plank Pose Tips for Yoga Teachers
If you are a teacher or in yoga teacher training, these cues work well in class:
“Stack shoulders over wrists.”
“Push the floor away.”
“Long line from crown to heels.”
“Firm the belly, don’t hold the breath.”
“Press back through the heels.”
Always offer the knee-down option without making it sound like the “weak” version. Many experienced practitioners use it on purpose to focus on alignment.
At Rishikul Yogshala in Rishikesh, foundational poses like Plank are taught with close attention to alignment, breath, and adjustments as part of our 200 Hour Yoga Teacher Training in Rishikesh. Learning the basics well in the birthplace of yoga makes every advanced pose safer later.
Conclusion
Plank Pose, or Phalakasana, is simple to learn and takes a long time to master. It builds strength from your shoulders to your heels, supports good posture, and prepares you for almost every arm-supported pose in yoga.
Start small. Hold for a few breaths with good form, rest, and try again. Over a few weeks, you will notice your arms shaking less, your core feeling stronger, and your Sun Salutations feeling lighter.
If you want to learn Plank Pose and other foundational asanas with proper alignment and expert guidance, join a yoga teacher training course at Rishikul Yogshala, Rishikesh, where traditional yoga meets modern, safe teaching methods.
Frequently Asked Questions About Plank Pose
Q
What is the Sanskrit name for Plank Pose?
A
The most common Sanskrit name is Phalakasana, from phalaka (plank or board) and asana (pose). It is also called Kumbhakasana, and in the Bihar School of Yoga, Santolanasana.
Q
Is Plank Pose good for beginners?
A
Yes. Plank Pose is a beginner-level pose. If the full version is too hard, start with knees on the floor and build up slowly.
Q
How long should I hold Plank Pose?
A
Beginners can start with 15 to 30 seconds. With regular practice, work up to about 1 minute. Good form matters more than a long hold.
Q
Does Plank Pose reduce belly fat?
A
Plank Pose strengthens and tones the abdominal muscles, but no single exercise burns fat from one area. Reducing belly fat depends on overall activity, diet, sleep, and lifestyle.
Q
What is the difference between Plank Pose and Chaturanga?
A
In Plank Pose, your arms are straight. In Chaturanga Dandasana, you lower halfway down with your elbows bent at about 90 degrees, close to your ribs.
Q
Why do my wrists hurt in Plank Pose?
A
Usually because your weight is on the outer edge of your hands or your shoulders are ahead of your wrists. Spread your fingers, press through the index finger and thumb, and keep your shoulders over your wrists. If pain continues, try forearm plank.
Q
Can I do Plank Pose every day?
A
Yes, most healthy people can practice Plank Pose daily for short holds, as long as there is no pain. Mix in variations and give your wrists rest if they feel sore.
Q
Is forearm plank the same as Plank Pose?
A
No. Classic Plank Pose (Phalakasana) is done on straight arms. Forearm plank is a variation done on the forearms, which takes pressure off the wrists.
This article is for general information and is not medical advice. If you have a respiratory or heart condition, are pregnant, or are unsure whether these practices suit you, please speak to your doctor before beginning.
Founder, Rishikul Yogshala | President, Yoga Association Rishikesh
Bipin Baloni Ji founded Rishikul Yogshala in 2010 and has been teaching here since the very first batch. He holds an M.Phil. in Yoga, a Postgraduate degree from Hemvati Nandan Bahuguna University, and has completed a 500-Hour Yoga Teacher Training Course. He started practicing in 2008, learning from direct students of BKS Iyengar and teachers from the Himalayan Tradition. He specialises in Hatha Yoga, Ashtanga Vinyasa, Pranayama, and Yoga Therapy. He also serves as President of the Yoga Association Rishikesh (also known as the Rishikesh Yoga Association/Alliance) — a position that reflects the trust the yoga community in Rishikesh has placed in him over many years.
Answer a few questions and we'll recommend the YTT path — 100, 200, 300 or 500-Hour — that fits your experience, goals and schedule. First, where are you in your journey?
Free Yoga Tips PDF at the end · No experience needed
Part 1 complete
Nicely done!
Now a few questions about you — your goals, your schedule and what you want from training.
Your recommended path
Get your free Yoga Tips PDF
Our best beginner-to-teacher tips, plus details on your recommended training. Enter your email and download it instantly — right here.
Please enter your name.
That email doesn't look quite right.
No spam — just your guide and helpful yoga tips.
You're all set
Your guide is ready
Your free Yoga Tips PDF is ready to download — tap the button below and it'll open right here on this page.










 +91-8433225327,
 Rishikul Yogshala Rishikesh, Narayan Kunj, Jonk Village, Ram Jhula, Swarg Ashram, Rishikesh, Uttarakhand 249304
 By Airway
 By Railway
 By Bus/Cabs