


Trikonasana (Triangle Pose): Steps, Benefits and Modifications
Table of Contents
- What Does Trikonasana Mean?
- Health Benefits of Trikonasana
- 1. Improves Hamstring Flexibility
- 2. Improves Hip Flexibility
- 3. Stretches the Side Body
- 4. Strengthens the Leg Muscles
- 5. Improves Balance and Stability
- 6. Engages the Core Muscles
- 7. Supports Mental Relaxation
- How to Do Trikonasana – Step-by-Step Instructions
- Which Muscles Are Worked During Trikonasana?
- Common Mistakes (and How to Fix Them)
- Who Should Avoid or Modify Trikonasana?
- Variations for Every Body
- Poses to Do Before and After Triangle
- Final Takeaway
- Trikonasana FAQs
- How long should I hold Trikonasana?
- What is the difference between Trikonasana and Utthita Trikonasana?
- Can beginners do Triangle Pose?
- Why can’t I reach the floor in Triangle Pose?
- Is Trikonasana good for back pain?
- Does Trikonasana help with weight loss?
- Which muscles does Trikonasana work?
- Can I do Trikonasana every day?
- Who should not do Trikonasana?
Most students can’t touch the floor in their first Triangle Pose.
And that’s fine.
Touching the floor was never the point.
So what is the point?
A long, straight line from your back heel to the top of your head. Two legs and one arm making a steady triangle. Breath moving easily while your legs work hard.
In our teacher training classes in Rishikesh, Trikonasana comes up again and again. It looks simple. It isn’t. And the small details are what turn it from a stretch into a real pose.
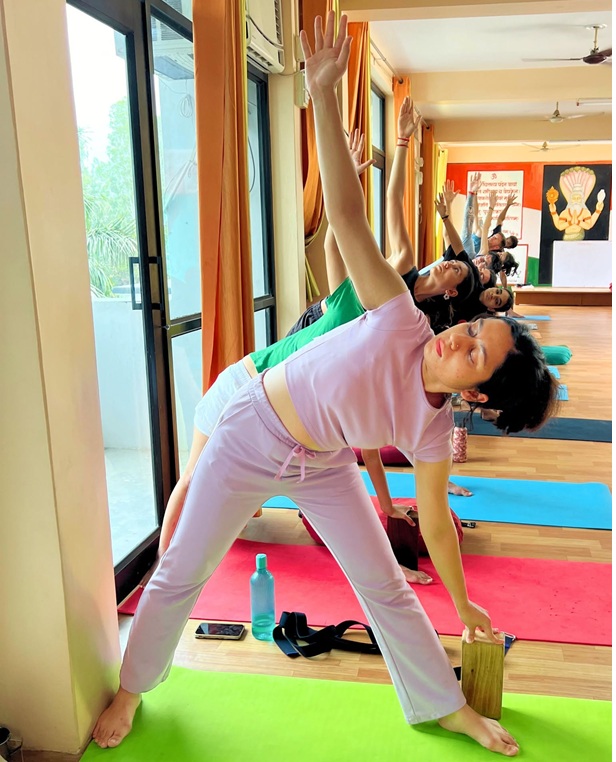
Trikonasana (Triangle Pose) is a standing yoga pose. You stand with your feet wide, turn your front foot out, reach your torso sideways over your front leg, and stretch one arm down and one arm up. Hold it for 5 to 8 slow breaths on each side. It stretches the hamstrings, hips, and side body, and builds strength in the legs and core.
What Does Trikonasana Mean?
The name comes from Sanskrit.
- Tri = three
- Kona = angle or corner
- Asana = pose
So Trikonasana means “three-angle pose”. Look at someone in the pose, and you’ll see more than one triangle: between the legs and the floor, and between the front leg, the torso, and the lower arm.
You’ll also see the name Utthita Trikonasana. Utthita means “extended”. In most modern schools, including the Iyengar tradition, Utthita Trikonasana simply is the standard Triangle Pose. It is not a separate advanced version.
What Triangle is not: it’s not a forward bend. Your torso tips sideways, as if you were standing between two panes of glass. This one idea fixes most beginner mistakes, which we’ll come back to.
Health Benefits of Trikonasana
You’ve been sitting at a desk all day. Your hips feel stuck. Your lower back is tight. Your shoulders have crept up toward your ears.
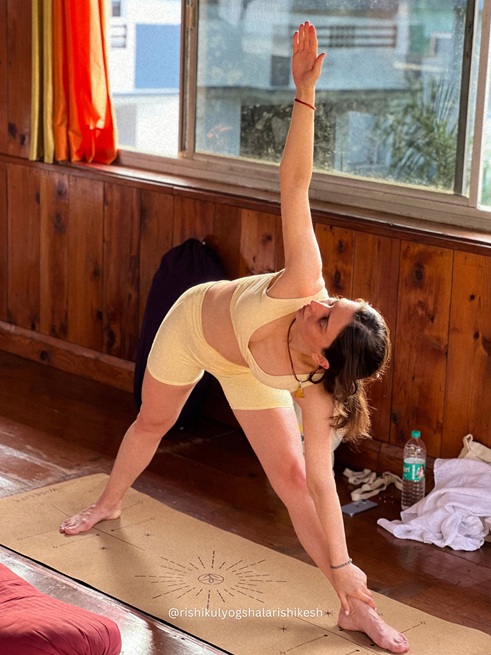
Trikonasana, also known as Triangle Pose, stretches the legs, hips, and sides of the body while engaging the muscles that support good posture. Regular practice can help improve flexibility, balance, and body awareness. It also encourages you to focus on your alignment and breathing while holding the pose.
That’s what Trikonasana gives you. Not magic, just a real, felt change in how your body moves.
Here’s what Trikonasana can do for you:
1. Improves Hamstring Flexibility
Trikonasana stretches the hamstrings, which are the muscles located at the back of your thighs. Regular practice can help improve flexibility in these muscles and make everyday movements, such as bending and reaching, more comfortable.
2. Improves Hip Flexibility
Sitting for long periods can make the hips feel stiff. Trikonasana stretches the inner thighs and surrounding hip muscles. Practising this pose with proper alignment can help improve hip flexibility and make the lower body feel more mobile.
3. Stretches the Side Body
Trikonasana creates a gentle stretch along the sides of your waist and torso. It works the muscles around your ribs and helps improve flexibility in the upper body. Maintaining a comfortable position also allows you to practise slow and steady breathing.
4. Strengthens the Leg Muscles
Trikonasana engages the muscles of your thighs, calves, and ankles to keep your body stable. Holding the position with proper alignment helps build leg strength and improves stability during standing movements.
5. Improves Balance and Stability
Trikonasana requires you to maintain a wide stance while moving your upper body sideways. This helps develop body awareness, coordination, and balance. With regular practice, you may become more comfortable maintaining stability in other standing yoga postures.
6. Engages the Core Muscles
Your abdominal and side-body muscles work to keep your torso stable while practising Trikonasana. These muscles help you maintain proper posture and prevent your upper body from collapsing towards the floor.
7. Supports Mental Relaxation
Trikonasana encourages you to focus on your body, alignment, and breathing. Practising the pose with slow and steady breaths can help you become more mindful of the present moment. Like other yoga practices, it may also support relaxation and help reduce everyday stress.
What about back pain? Triangle Pose may ease mild stiffness in the lower back because it stretches and strengthens the muscles around the spine and hips. Studies on yoga as a full practice suggest a modest benefit for low-back pain (NCCIH).
If your back pain is sharp, ongoing or came from an injury, see a doctor first. Then learn the pose with a teacher.
What about belly fat? No pose burns fat from one spot. Trikonasana builds strength and belongs in an active, regular practice, and that’s how it supports a healthy body.
How to Do Trikonasana – Step-by-Step Instructions
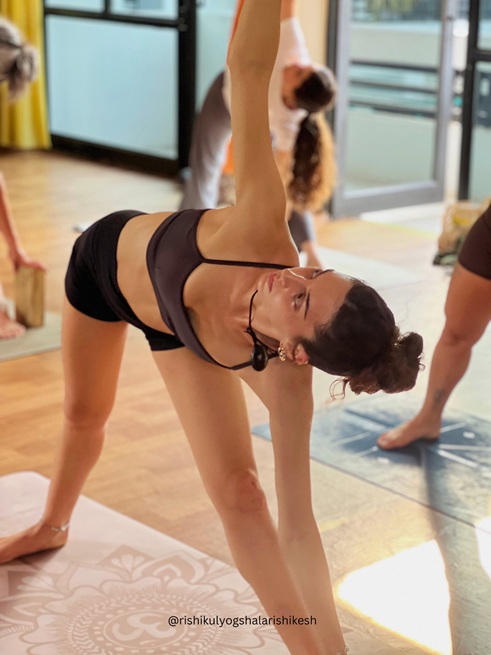
Read this once. Then try it slowly. These steps are for the right side.
You’ll need: a non-slip mat. A yoga block is useful if your hamstrings are tight.
- Start in Tadasana (Mountain Pose). Stand at the middle of the long side of your mat.
- Step your feet wide. About 3 to 3.5 feet apart, or roughly the length of one of your legs. Raise your arms out to the sides at shoulder height, palms down.
- Set your feet. Turn your right foot out 90° so the toes point to the short end of the mat. Turn your left foot in slightly, about 15°. Line up your right heel with the middle of your left foot.
- Engage your thigh muscles and keep your right knee straight without forcing it backwards. Make sure your right knee stays in line with your right toes. Keep your hips in a comfortable position and avoid forcing them into alignment. As you move into the pose, gently open your chest towards the side while keeping your spine long.
- Reach, then tip. Breathe in and stretch your right arm out over your right leg, as if someone is pulling your hand. Breathe out and let your torso tip sideways from the hip, not the waist.
- Place your right hand on your shin or ankle, or use a yoga block for support. You can also place your hand on the floor if your flexibility allows. Do not force your hand towards the floor. Focus on keeping your spine long and your chest open.
- Raise your top arm. Stretch your left arm straight up, in line with your shoulders, palm facing forward.
- Choose your gaze. Look up at your left thumb. If your neck feels strained, look straight ahead or down at the floor.
- Hold and breathe. Stay for 5 to 8 slow breaths. Beginners can start with 3 to 5.
- Come out with control. Breathe in, press into your feet, and lift up through your top arm. Turn your feet back to parallel, then repeat on the left side.
Breathing tip: If you can’t breathe slowly and smoothly, you’ve gone too far. Come up an inch and try again.
Which Muscles Are Worked During Trikonasana?
Trikonasana engages several muscle groups in the upper and lower body. The pose stretches the hamstrings, inner thighs, calves, and muscles along the sides of the torso. At the same time, the quadriceps, glutes, abdominal muscles, and ankles work to maintain balance and stability.
The amount of stretch and muscle engagement may vary depending on your flexibility, body alignment, and how you perform the pose.
Common Mistakes (and How to Fix Them)
Why do so many people feel nothing in Triangle Pose, or feel it in the wrong place?
Usually it’s one of these.
| Mistake | What it feels like | The fix |
|---|---|---|
| Reaching for the floor at any cost | Rounded back, squashed bottom side | Bring your hand up to your shin or a block |
| Chest turning down to the floor | Pose feels like a forward bend | Imagine your back against a wall. Turn your top ribs up |
| Locking or hyperextending the front knee | Pressure behind the knee | Keep your front leg straight but avoid pushing the knee backwards or locking it forcefully. Engage your thigh muscles to maintain stability and keep your knee aligned with your toes. |
| Stance too wide or too narrow | Wobbly, or no stretch at all | Use leg length as your guide, then adjust by a few inches |
| Front knee rolling inward | Strain on the inner knee | Turn the thigh out so the knee tracks over the second toe |
| Cranking the neck to look up | Tight, tired neck | Look forward or down. The pose works the same |
| Holding the breath | Face goes tense, pose feels hard | Slow down. Breathing is part of the pose |
While practising Trikonasana, avoid forcing your body into a deep sideways stretch. Keep your front knee comfortable and avoid locking it backwards. If you feel pain in your knees, hips, neck, or lower back, come out of the pose slowly.
Beginners can use a yoga block or practise near a wall for additional support. If you have an existing injury or medical condition, consult a healthcare professional before including this pose in your routine.
Who Should Avoid or Modify Trikonasana?
Is Triangle Pose safe for everyone?
For most healthy people, yes. But some people should change it, and a few should skip it for now.
| If you have… | What to do |
|---|---|
| A recent injury to the hamstring, hip, knee or lower back | Skip it until you’ve healed, or ask your doctor or physio first |
| Neck pain or a neck injury | Keep your gaze forward or down, never up |
| Low blood pressure or a tendency to get dizzy | Come up slowly. Look down instead of up |
| A heart condition or high blood pressure | Ask your doctor first. Many teachers suggest keeping the top hand on the hip instead of raising the arm |
| Pregnancy | Ask your doctor or midwife first. Practise with your back against a wall and a block under your hand. Don’t push the stretch |
| Poor balance | Use the wall or chair variation below |
| A headache, migraine or upset stomach today | Rest. Try it another day |
A simple rule: a stretch should feel strong, but never sharp, pinching, or numb. If it does, come out.
Variations for Every Body
Your body today decides your version of the pose. Here are five, from most supported to most challenging.
1. Triangle with a block (tight hamstrings). Stand a block on its tallest side just outside your front foot. Rest your hand on it. Lower the block to a shorter side as you open up.
2. Triangle at the wall (wobbly balance). Stand with your back heel, hips, and shoulders close to a wall. Let the wall tell you if your chest is turning down. This is also the best way to feel the “two panes of glass” idea.
3. Chair-supported Triangle (beginners, seniors, stiff backs). Place a chair at the front of your mat. Rest your lower hand on the seat instead of your leg.
4. Seated Triangle in a chair (limited standing). Sit near the front edge of a chair. Stretch one leg out to the side with the knee pointing up. Slide that arm down along the leg and reach the other arm up.
5. Revolved Triangle, Parivrtta Trikonasana (experienced students). This is a twist, not a side bend, and it’s harder on balance. Your back hand comes down by your front foot, and your chest turns toward the front leg. Learn it with a teacher first.
Poses to Do Before and After Triangle
Triangle feels much easier when your body is ready for it.
Warm up with:
- Tadasana (Mountain Pose) to set up your standing alignment
- Supta Padangusthasana (Reclined Hand-to-Big-Toe Pose) with a strap, to open the hamstrings
- Virabhadrasana II (Warrior II), which uses almost the same foot position
Follow with:
- Utthita Parsvakonasana (Extended Side Angle), a bent-knee cousin of Triangle
- Ardha Chandrasana (Half Moon), the natural next step for balance
- Prasarita Padottanasana (Wide-Legged Forward Bend) to release the legs
New to yoga? Start with our guide to yoga poses for beginners. Curious how all these poses fit together in a full course? See the yoga poses and postures you’ll learn in teacher training.
Final Takeaway
Triangle Pose rewards patience more than flexibility.
Here’s everything in six lines:
- Feet wide, front foot out 90°, back foot in a little
- Tip sideways from the hip, like you’re between two panes of glass
- Hand on shin, ankle or block. Length beats depth
- Top arm straight up, gaze wherever your neck is happy
- 5 to 8 slow breaths, then switch sides
- Modify for injury, pregnancy, or blood pressure, and ask your doctor when unsure
Want to learn poses like this the right way, with a teacher beside you? Our 200 Hour Yoga Teacher Training in Rishikesh covers Trikonasana and the full family of standing poses, with alignment, teaching methods, and anatomy. Already a teacher? Go deeper with the 300 Hour Yoga Teacher Training.
Practised Triangle Pose today? Tell us in the comments which variation worked best for you.
Trikonasana FAQs
How long should I hold Trikonasana?
Hold it for 5 to 8 slow breaths on each side, which is about 30 to 60 seconds. Beginners can start with 3 to 5 breaths and build up.
What is the difference between Trikonasana and Utthita Trikonasana?
In most schools there is none. Utthita means “extended”, and Utthita Trikonasana is the standard Triangle Pose. Parivrtta Trikonasana, the revolved version, is a different pose.
Can beginners do Triangle Pose?
Yes. Use a block or rest your hand on your shin. Keeping your side body long matters far more than how low your hand goes.
Why can’t I reach the floor in Triangle Pose?
Tight hamstrings and hips are the usual reason. It’s normal, so don’t force it. Use a block and the reach will come with practice.
Is Trikonasana good for back pain?
Trikonasana may help improve flexibility in the hips and muscles around the spine. However, it should not be considered a treatment for back pain. If you have ongoing back pain, a recent injury, or discomfort while practising, consult a healthcare professional before attempting the pose.
Does Trikonasana help with weight loss?
Trikonasana alone does not cause significant weight loss or burn fat from specific areas of the body. However, it can be included in a regular yoga routine to improve flexibility, strengthen muscles, and support an active lifestyle. A balanced diet and regular physical activity are also important for maintaining a healthy weight.
Which muscles does Trikonasana work?
It stretches the hamstrings, calves, inner thighs, hips and side waist. It strengthens the thighs, glutes, ankles and the core muscles that keep your torso steady.
Can I do Trikonasana every day?
Yes, you can practise Trikonasana daily if your body feels comfortable and you maintain proper alignment. Beginners should start slowly and avoid overstretching. If you experience pain or discomfort, take a break and seek guidance from a qualified yoga teacher.
Who should not do Trikonasana?
People with recent injuries to the knees, hips, hamstrings, or lower back should avoid practising Trikonasana until they have recovered or received professional advice. Those with balance problems, neck injuries, or certain medical conditions may need to modify the pose. Pregnant women should practise only with appropriate guidance from a qualified professional.
This article is for general information and is not medical advice. If you have a respiratory or heart condition, are pregnant, or are unsure whether these practices suit you, please speak to your doctor before beginning.

 +91-8433225327,
 Rishikul Yogshala Rishikesh, Narayan Kunj, Jonk Village, Ram Jhula, Swarg Ashram, Rishikesh, Uttarakhand 249304
 By Airway
 By Railway
 By Bus/Cabs