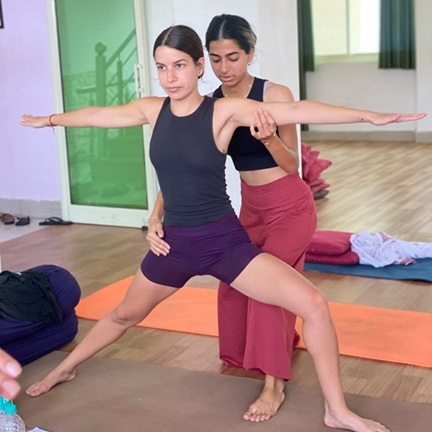
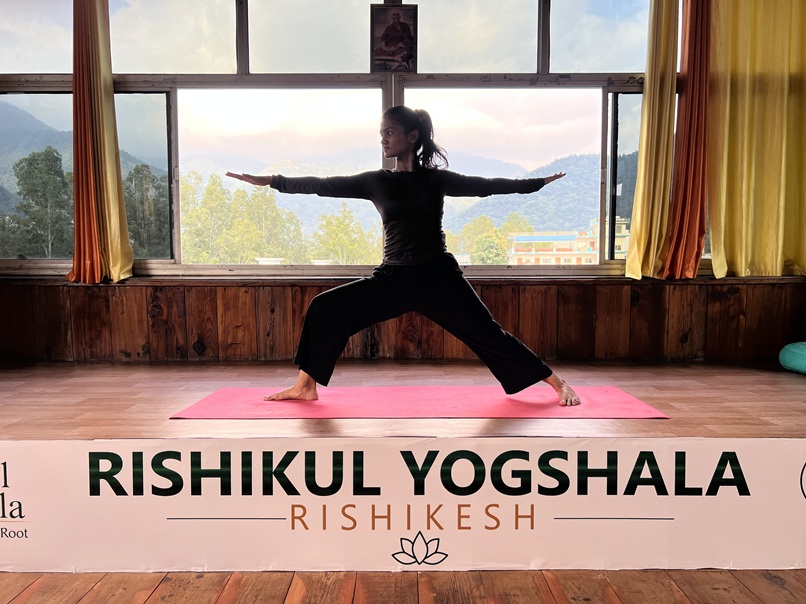
Virabhadrasana II is a foundational standing posture in Hatha and Vinyasa yoga in which the legs form a wide, stable base, the front knee bends over the front ankle, and the arms reach in opposite directions at shoulder height. It builds lower-body strength and hip mobility while training steadiness of gaze and breath.
Of the three Warrior poses, Warrior II is the steady, lateral one; Warrior I faces forward with square hips. Warrior III balances on one leg. Warrior II opens sideways: hips and chest face the long edge of the mat while the gaze travels forward over the front hand. That combination of a fierce lower body and an open, quiet upper body is what makes it such a useful teaching pose.
What Does “Virabhadrasana” Mean?
Sanskrit
Meaning
Vīra (वीर)
Hero, brave, warrior
Bhadra (भद्र)
Auspicious, good, blessed
Āsana (आसन)
Seat, posture
So Virabhadrasana translates as “the posture of the auspicious hero.”
A correction worth making: Virabhadrasana is a Sanskrit name, not a Hindi one. The word is used in Hindi too, written the same way, वीरभद्रासन, because it is borrowed directly from Sanskrit, but the language of origin is Sanskrit.
The Story Behind The Pose
Virabhadra was a warrior created by Shiva. In the traditional account, Shiva’s consort Sati self-immolated at the sacrifice held by her father, King Daksha, who had insulted Shiva. In grief and rage, Shiva tore a lock from his hair, and from it Virabhadra arose. The three Warrior poses are read as three moments in that story: Virabhadra rising with his sword (Warrior I), sighting Daksha across the hall (Warrior II), and moving to strike (Warrior III).
The story is retold in Kālidāsa’s Sanskrit epic Kumārasambhava. It is worth knowing not because it changes the alignment, but because it changes the quality of the pose: Warrior II is not aggression; it is focused resolve. When students understand that, the pose stops being a leg burn and starts being a practice of steadiness.
How to Do Virabhadrasana II: Step-by-Step
Set-up: Stand at the centre of your mat, facing the long edge. Step your feet 3.5 to 4.5 feet apart, roughly one leg-length. Your ankles should sit approximately under your wrists when the arms are extended.
Turn the front foot out 90 degrees. Pivot your right foot so the toes point directly at the short edge (front) of the mat.
Turn the back foot in 10–15 degrees. Angle the left toes slightly toward the front of the mat. Keep the outer edge of the back foot grounded — this is your anchor.
Align the feet. Line up your right heel with the arch of your left foot. If you feel wobbly, widen the stance side-to-side so the heels sit on two parallel tracks rather than one line.
Ground and lift. Press down through the outer edge of the back foot and the big-toe mound of the front foot. Draw energy up the inner thighs.
Extend the arms. On an inhale, reach the arms out to shoulder height, palms facing down — right arm forward over the right leg, left arm back. Shoulders stay away from the ears; the reach comes from the shoulder blades, not the neck.
Bend the front knee on an exhale. Bend the right knee until the shin is vertical and the knee stacks directly over the ankle. Aim for a 90-degree bend, but only as far as you can go while keeping the knee stacked and the back foot grounded.
Track the knee outward. Guide the right knee toward the little-toe side of the right foot so it does not drift inward. You should be able to see your big toe on the inside of the knee.
Square the torso to the long edge. Stack the shoulders over the hips. Do not lean over the front leg — the crown of the head stays above the pelvis.
Set the drishti. Turn the head to gaze softly over the middle finger of your front hand. Keep the jaw and throat soft.
Breathe and hold. Stay for 5–10 slow breaths. Let each exhale settle the hips; let each inhale lengthen the spine.
Release. Inhale and straighten the front leg. Lower the arms, turn the feet parallel, and pause. Then repeat on the second side.
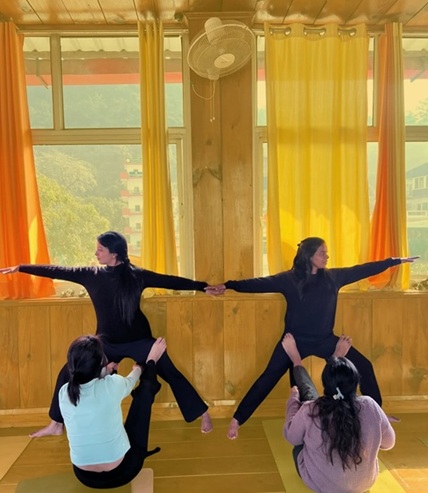
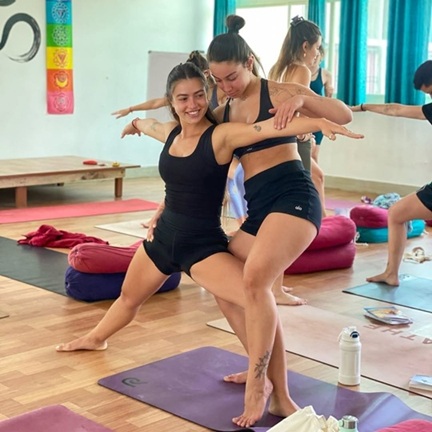
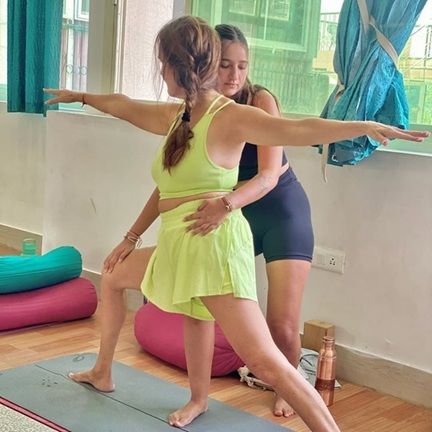
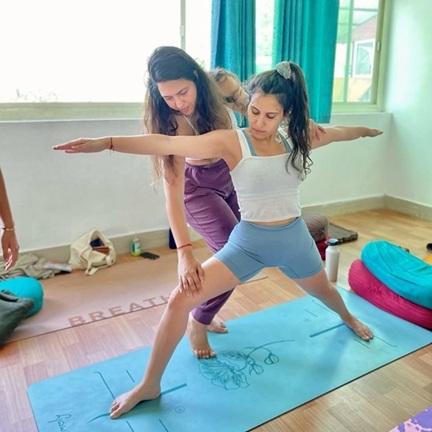
Note: These poses are also practised and studied in detail during Yoga Instructor Training in Rishikesh, where students learn proper alignment, adjustments, sequencing, and teaching techniques under experienced yoga teachers.
How Long Should You Hold Warrior II?
Hold for 5–10 breaths, roughly 30–60 seconds per side, in a general practice. In a strength-focused or Iyengar-influenced class, holds of 60–90 seconds with props are common. Beginners are better served by two shorter holds per side than one long, collapsing hold.
Muscles Worked in Warrior II
Warrior II loads the legs isometrically while opening the front body, an unusual combination, and the reason it appears in almost every style of practice.
Role
Muscles
Strengthened (front leg)
Quadriceps, gluteus maximus and medius, hamstrings, adductors, tibialis anterior
Strengthened (back leg)
Gluteus medius, adductor magnus, calf and peroneal muscles, tibialis posterior
Strengthened (upper body)
Anterior, middle and posterior deltoids, trapezius, rhomboids, erector spinae
Stretched
Inner thighs and groin (adductors), hip flexors of the back leg, pectorals, intercostals
Stabilising
Transverse abdominis, obliques, deep hip rotators, foot intrinsics
The most common sensation complaint, burning in the front thigh, is the quadriceps working isometrically. That is the pose doing its job. Sharp pain at the front or inside of the knee is not, and means the alignment needs correcting.
10 Benefits of Virabhadrasana II
These are the effects supported by anatomy and by consistent teaching experience. Yoga is a supportive practice, not a treatment; nothing below replaces medical care.
Builds lower-body strength. Sustained isometric holds load the quadriceps, glutes, and adductors of both legs at once, which is why Warrior II is used as a strength-building posture in almost every style.
Opens the hips and inner thighs. The wide stance with external rotation of the front hip lengthens the adductors and deep hip rotators — the tissues most affected by long hours of sitting.
Opens the chest and shoulders. The lateral arm reach draws the shoulder blades down and back, counteracting the rounded-shoulder posture of desk and phone use.
Improves balance and proprioception. Holding a wide base under an asymmetrical load trains the ankle and hip stabilisers. Improved balance and strength are among the more consistently reported physical outcomes of regular yoga practice.
Strengthens the ankles and feet. Pressing through the outer edge of the back foot while keeping the front arch lifted works the small stabilising muscles that most footwear allows to go slack.
Supports better posture. Stacking shoulders over hips against the pull of the extended arms trains the erector spinae and scapular retractors in a functional, upright position.
Builds stamina and concentration. A held pose with an active gaze gives the mind a single point of focus. Students who cannot sit still in meditation often get their first taste of concentration here.
Trains steady breathing under effort. Learning to keep the breath long and even while the legs burn is directly transferable to stressful situations off the mat.
Relieves stiffness from prolonged sitting. Lengthening the hip flexors and adductors and opening the chest can ease the tightness that accumulates through a desk-bound day.
Cultivates focus and resolve. In the yogic framing, Warrior II is associated with grounding through Muladhara (the root chakra) and with the steadiness of a fixed gaze. Whether you read that energetically or psychologically, the practical result is the same: it teaches you to hold a difficult position calmly.
7 Common Mistakes in Warrior II (and How to Fix Them)
These are the corrections we give most often on the mat in Rishikesh. If you fix only the first one, you will have fixed the most important one.
Mistake
Why it Matters
The Fix
Front knee collapses inward
Puts shear stress on the medial knee; the most common cause of knee pain in this pose
Track the knee toward the little-toe side. Check you can see your big toe inside the knee line
Knee travels past the ankle
Loads the knee joint instead of the muscles
Widen the stance. The shin should be vertical
Back foot lifts or rolls in
Loses the anchor; the whole pose becomes unstable
Press the outer edge and heel of the back foot down. Shorten the stance if needed
Torso leans over the front leg
Compresses the front hip and disengages the core
Imagine a wall behind you. Stack shoulders over hips, crown over pelvis
Shoulders hunched to the ears
Creates neck tension and blocks the chest opening
Reach out through the fingertips while sliding the shoulder blades down the back
Ribs flaring, low back arching
Overloads the lumbar spine
Gently draw the front lower ribs in and lengthen the tailbone down
Chasing a 90-degree knee bend
Alignment always outranks depth
Bend only as far as you can while keeping the knee stacked and the back foot grounded. A 45-degree bend with good alignment beats 90 degrees with a collapsed knee
Modifications and Props
Props are not a beginner’s compromise. In the Iyengar tradition, they are how you learn a pose correctly, and experienced practitioners use them too.
Warrior II at the Wall
Stand with your back and the outer edge of your back foot against a wall. The wall gives immediate feedback if you lean forward, and helps you feel the torso stacking vertically. Place a block between your front shin and the wall to stop the knee drifting inward.
Warrior II With a Chair
Sit on the front edge of a sturdy chair, straddling it so the front thigh is supported and the back leg extends behind with the foot turned in. Extend the arms as usual, or rest the hands on the hips. This is the best option for seniors, people with balance difficulties, and anyone recovering from injury or fatigue — and it lets you hold the pose long enough to actually learn the upper-body alignment.
Warrior II with a Block
Place a block under the front thigh to build awareness of the leg’s position without fatigue, or between the front shin and a wall to train knee tracking.
Other Useful Adjustments
Knee sensitivity: shorten the stance and reduce the knee bend.
Shoulder issues: rest the hands on the hips instead of extending the arms.
Neck issues: keep the gaze forward over the long edge of the mat rather than turning the head.
Unsteady balance: widen the feet laterally so the heels sit on two tracks, and practise near a wall.
Variations and Progressions
Reverse Warrior (Viparita Virabhadrasana): from Warrior II, turn the front palm up, lift the front arm overhead and slide the back hand down the back leg. Adds a side-body stretch.
Extended Side Angle (Utthita Parsvakonasana): bring the front forearm to the front thigh, or the hand to a block, and reach the top arm over the ear.
Humble Warrior (Baddha Virabhadrasana): interlace the hands behind the back and fold the torso inside the front leg. A deeper shoulder opener.
Warrior I (Virabhadrasana I): hips face forward, arms overhead.
Warrior III (Virabhadrasana III): the balancing warrior — torso and back leg parallel to the floor.
Where it fits in a sequence: Warrior II belongs in the standing sequence, after the body is warm — typically following Sun Salutations and before deeper hip openers or balances. It is not a pose to walk onto a cold mat and hold.
Who Should Avoid Virabhadrasana II?
Stop if you feel sharp pain at any point. The following need modification or medical clearance:
Condition
Guidance
Knee injury or instability
Reduce the knee bend significantly, or practise the chair version. Avoid entirely if there is acute pain
Recent hip or groin injury
Narrow the stance and reduce external rotation. Progress gradually, with supervision
Acute lower back pain or disc issues
Avoid long holds. Engage the core, keep the stance short, and consult a physiotherapist first
Ankle or foot injury
Practise with the back heel against a wall, or use the chair variation
Cardiac conditions or recent heart surgery
Standing holds raise the heart rate. Shorten holds substantially and get medical clearance first
Uncontrolled high blood pressure
Prolonged extended-arm holds can raise blood pressure. Rest the hands on the hips, keep holds short, and clear it with your doctor
Balance disorders or vertigo
Practise beside a wall. Keep the gaze forward instead of turning the head
Pregnancy
Generally suitable from the second trimester with a shorter stance, wall support and a reduced knee bend. Avoid breath retention and deep twisting. Practise with a qualified prenatal yoga teacher and your doctor’s approval
Medical disclaimer: This guide is for general educational purposes and is not medical advice. If you are pregnant, recovering from injury or surgery, or managing a chronic condition, consult a qualified healthcare professional before beginning or changing a yoga practice.
When Is the Best Time to Practise Warrior II?
The traditional recommendation for sadhana is Brahma Muhurta, roughly 3:40 AM to 5:20 AM, the ninety-minute window before sunrise, considered the most sattvic time of day.
In practical terms, early morning on an empty stomach is ideal: the mind is quiet, and the practice sets the tone for the day. If mornings are impossible, an evening session between 4 PM and 6 PM works well, provided you leave at least 3–4 hours after a full meal and 1–2 hours after a light snack. Consistency matters more than the hour; a daily 4 PM practice beats an occasional 4 AM one.
Final Thoughts
Warrior II looks simple, which is exactly why it is worth returning to. The legs learn to work, the hips learn to open, and the gaze learns to stay steady while all of that is happening. That last part is the actual practice.
Start with the wall or the chair if you need to. Fix the knee tracking before you chase the 90-degree bend. And hold the pose one breath longer than you think you can; that breath is where the pose changes from exercise into yoga.
If you would like to learn this alignment hands-on, our Yoga Teacher Training in Rishikesh, Indiacovers standing-pose alignment, adjustment and sequencing in depth, on the banks of the Ganga.
Frequently Asked Questions:-
Q
What is Warrior II pose called in Sanskrit?
A
Warrior II is called Virabhadrasana II (वीरभद्रासन द्वितीय) in Sanskrit. The name is often assumed to be Hindi, but it comes from Sanskrit: vīra (hero) + bhadra (auspicious) + āsana (posture).
Q
How long should I hold Warrior II?
A
Hold for 5–10 breaths — about 30 to 60 seconds — on each side. Strength-focused or Iyengar-style practices may extend this to 60–90 seconds. Beginners should build up gradually rather than holding a collapsing pose.
Q
What muscles does Warrior II work?
A
Warrior II strengthens the quadriceps, glutes, hamstrings, adductors, calves, deltoids and core, and stretches the inner thighs, groin, hip flexors of the back leg, chest and shoulders.
Q
Is Warrior II a beginner pose?
A
Yes. Warrior II is accessible to complete beginners and is usually taught within the first few classes. The alignment, however, takes time to refine — even long-term practitioners keep working on knee tracking and torso stacking.
Q
Why does my front knee hurt in Warrior II?
A
Almost always because the knee is collapsing inward or travelling past the ankle. Track the knee toward the little-toe side of the front foot, and widen your stance so the shin is vertical. If pain persists, stop and see a professional.
Q
Can I do Warrior II during pregnancy?
A
Generally yes, from the second trimester, with a shorter stance, a reduced knee bend and wall support. Avoid breath retention and deep twisting. Always get clearance from your doctor and work with a qualified prenatal yoga teacher.
Q
What is the difference between Warrior I and Warrior II?
A
In Warrior I, the hips face the front of the mat, the back foot turns in 45–60 degrees and the arms lift overhead. In Warrior II the hips open to the side, the back foot turns in only 10–15 degrees and the arms extend parallel to the floor.
Q
Does Warrior II cure infertility?
A
No. No yoga pose cures infertility. Warrior II can support pelvic and core strength and help reduce stress, which may be useful alongside medical care, but it is not a treatment. Anyone facing fertility challenges should consult a doctor.
Q
What are the spiritual benefits of Warrior II?
A
Traditionally, Warrior II is associated with grounding through the Muladhara (root) chakra and with cultivating courage and resolve. Practically, the sustained hold and fixed drishti train focus and equanimity under effort.
Q
How wide should my stance be in Warrior II?
A
About 3.5 to 4.5 feet, or roughly one leg-length, so that when the front knee bends the shin is vertical and the knee sits directly over the ankle. If the knee travels past the ankle, step wider.
Q
Should the heels be in one line in Warrior II?
A
Classically, the front heel lines up with the arch of the back foot. If your balance is unsteady, place the feet on two parallel tracks — slightly wider apart side-to-side. Stability comes first.
Q
How often should I practise Warrior II?
A
Daily is fine. Two to three rounds per side within a standing sequence, three to five times a week, is enough to build noticeable leg strength and hip mobility within four to six weeks.
This article is for general information and is not medical advice. If you have a respiratory or heart condition, are pregnant, or are unsure whether these practices suit you, please speak to your doctor before beginning.
Founder, Rishikul Yogshala | President, Yoga Association Rishikesh
Bipin Baloni Ji founded Rishikul Yogshala in 2010 and has been teaching here since the very first batch. He holds an M.Phil. in Yoga, a Postgraduate degree from Hemvati Nandan Bahuguna University, and has completed a 500-Hour Yoga Teacher Training Course. He started practicing in 2008, learning from direct students of BKS Iyengar and teachers from the Himalayan Tradition. He specialises in Hatha Yoga, Ashtanga Vinyasa, Pranayama, and Yoga Therapy. He also serves as President of the Yoga Association Rishikesh (also known as the Rishikesh Yoga Association/Alliance) — a position that reflects the trust the yoga community in Rishikesh has placed in him over many years.
Answer a few questions and we'll recommend the YTT path — 100, 200, 300 or 500-Hour — that fits your experience, goals and schedule. First, where are you in your journey?
Free Yoga Tips PDF at the end · No experience needed
Part 1 complete
Nicely done!
Now a few questions about you — your goals, your schedule and what you want from training.
Your recommended path
Get your free Yoga Tips PDF
Our best beginner-to-teacher tips, plus details on your recommended training. Enter your email and download it instantly — right here.
Please enter your name.
That email doesn't look quite right.
No spam — just your guide and helpful yoga tips.
You're all set
Your guide is ready
Your free Yoga Tips PDF is ready to download — tap the button below and it'll open right here on this page.










 +91-8433225327,
 Rishikul Yogshala Rishikesh, Narayan Kunj, Jonk Village, Ram Jhula, Swarg Ashram, Rishikesh, Uttarakhand 249304
 By Airway
 By Railway
 By Bus/Cabs