








Reverse Warrior (Viparita Virabhadrasana): Steps, Benefits, and Beginner Tips
Table of Contents
- What Is Reverse Warrior?
- What Does Viparita Virabhadrasana Mean?
- How To Do Reverse Warrior Pose?
- Getting Comfortable with the Starting Position
- Check Your Feet and Front Knee
- Keep The Back Leg Active
- Reach Upward Before Leaning
- Benefits of Reverse Warrior Pose
- 1. A Stretch Through Your Side
- 2. Work For Your Lower Body
- 3. A Stretch Around The Hips and Groin
- What Should the Reverse Warrior Pose Feel Like?
- Common Mistakes and Simple Fixes
- Easier Ways to Practise
- Use Less Bend In Your Front Knee
- Make The Upper-Body Movement Smaller
- Keep Your Gaze Ahead
- Advanced Reverse Warrior: Is a Deeper Bend Better?
- A Cautious Way To Explore a Half Bind
- Safety Tips and When to Ask for Help
- How to Fit the Reverse Warrior Pose into a Short Practice
- Who Should Avoid Reverse Warrior Pose?
- Skip this pose if you have:
- Be careful and check with a teacher or doctor if you are:
- Stop immediately if you feel:
- Final Thoughts
- Frequently Asked Questions
- Can a complete beginner try Reverse Warrior?
- How long should I hold it?
- Where should I feel the stretch?
- Is Reverse Warrior a backbend or a side bend?
- I searched for “reverse virabhadrasana” — is this the same pose?
- Do I have to touch my calf with the lower hand?
- Should I practise both sides?
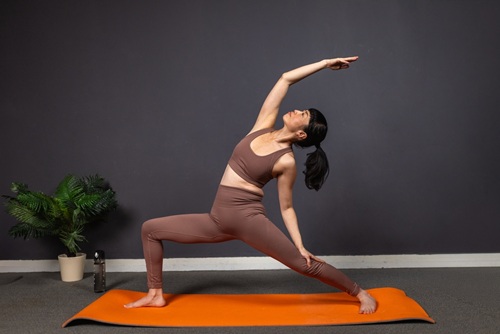
Reverse Warrior is a standing yoga pose in which you bend one knee, keep the other leg straight, and reach one arm overhead. Also called Viparita Virabhadrasana, it stretches the side of your body while your legs work to keep you steady.
The shape may look a little tricky in a photo. Where should your feet go? How far should you lean? And do you really need to look up at your hand?
Let’s take it one part at a time. In this guide from Rishikul Yogshala Rishikesh, you’ll find short steps, plain explanations, and ways to keep the movement manageable.
You don’t need to aim for a big bend. Focus on reaching upward and gently stretching your side, rather than leaning deeply into your lower back.
What Is Reverse Warrior?
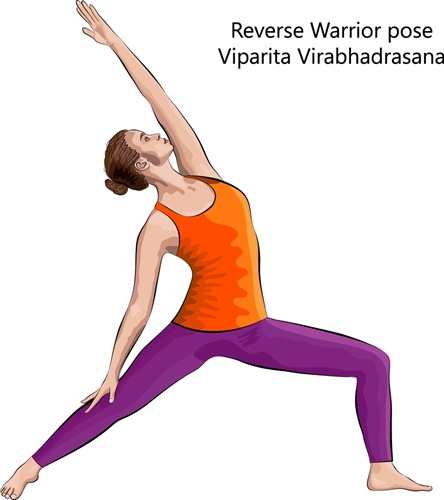
Reverse Warrior begins with the same leg position as Warrior II: one knee bent, the back leg straight, and both feet on the floor. The difference is in the upper body, where the front arm reaches up and back while the other hand rests lightly on the back leg.
If you’ve never tried Warrior II, don’t worry. The instructions below explain the starting position, so you won’t need another tutorial open beside this one.
Think of the pose as two jobs happening together. Your legs hold a steady base, while your upper body reaches up and gently toward the back leg.
What Does Viparita Virabhadrasana Mean?
Viparita means “reversed,” and asana means “pose.” Virabhadra is a warrior figure from Hindu mythology — Vira means “warrior” or “hero,” and Bhadra means “friend” or “auspicious.” The three Warrior poses are named after him.
You don’t have to memorise the Sanskrit before practising. For now, remember the English name and the basic shape; the longer name can become familiar over time.
How To Do Reverse Warrior Pose?
Use a firm, non-slip surface and give yourself room to move your arms. Start with the right side, then repeat on the left.
- Stand with your feet comfortably wide apart.
- Point your right toes forward and your left toes mostly sideways.
- Turn your chest toward the long side of your mat.
- Bend your right knee over your ankle. Keep your left leg straight.
- Lift both arms to shoulder height. This is Warrior II.
- Breathe in. Reach your right arm up toward the ceiling as your left hand slides down to rest lightly on your left thigh.
- Keep your right knee bent. Look ahead, or up if comfortable.
- Hold for 3–5 easy breaths without forcing the stretch.
- Return upright, lower your arms, and repeat on the other side.
Keep this list nearby for a quick reminder. Read the sections below when you want more help with a particular part of the pose.
Getting Comfortable with the Starting Position
The arm movement comes last. Before reaching overhead, take a moment to arrange your feet and check that you can stand without wobbling.
Check Your Feet and Front Knee
Keep both feet grounded, including the outer edge of your back foot. Your front knee should point in the same direction as your front toes rather than dropping inward.
Don’t choose a very wide stance just because someone else uses one. If the starting position feels too demanding, try bringing your feet a little closer together and reducing the bend in your front knee.
Keep The Back Leg Active
Keep your back leg straight without locking the knee, and continue pressing the foot into the mat. That leg remains part of the pose even when your attention moves to the raised arm.
Try checking your feet once more after lifting your arm. It is an easy detail to forget when you’re learning several movements at once.
Reach Upward Before Leaning
Lift through your upper body before adding the side bend. Let your lower hand rest lightly on your thigh instead of using it to push yourself farther into the shape.
Imagine reaching for something on a high shelf, then moving your hand slightly behind you. Use that picture as a reminder to make the movement long and gentle rather than deep.
Benefits of Reverse Warrior Pose
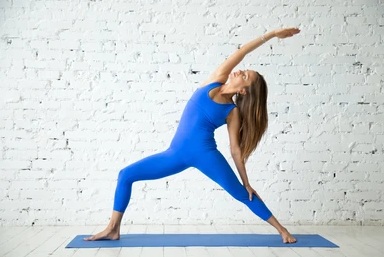
The main benefits of reverse warrior pose are a stretch through the side of the body and work for the legs and hips. It is also a pose that stretches the torso and arms, opens the hips, and builds lower-body strength.
Keep your expectations practical. Treat it as one movement within a balanced practice, not a quick fix for every ache or a promise of dramatic changes.
1. A Stretch Through Your Side
- The overhead reach stretches the side of your torso, including the area around your waist and ribs. When your right arm is raised, the right side of your body is the side being lengthened.
- Explore a small movement first. You don’t need to keep reaching farther just because the pose still looks quite upright.
2. Work For Your Lower Body
- The standing position asks your legs to support you while you hold the shape. This is why the pose is used for lower-body strength as well as stretching.
- Start with a hold you can manage comfortably. Avoid turning a beginner practice into a test of how long you can stay.
3. A Stretch Around The Hips and Groin
- The wide standing position also stretches the hips and groin area. The groin is the area where your inner thighs meet your body.
- Don’t chase the strongest possible sensation. Aim for a position you can enter and leave slowly, without needing to pull or push yourself into place.
What Should the Reverse Warrior Pose Feel Like?
You may notice a stretch along one side of your waist and into the raised arm, along with effort in your legs. Those areas match the pose’s main stretching and strengthening actions.
Use simple questions to check in with yourself. Can you breathe easily? Do your feet feel steady? Can you come out of the pose without rushing?
If the shape begins to feel more like a deep backbend than a side stretch, ease out a little and reach upward again. Keep the lengthening in your side body rather than trying to reach as far back as possible.
Don’t push through sharp pain, pinching, numbness, or dizziness. Stop the movement, and seek medical advice if symptoms are severe or do not settle.
Common Mistakes and Simple Fixes
There is no need to check every detail at once. Pick one or two of the points below, then add the others as the movement becomes more familiar.
- Straightening the front knee: Keep the bend you started with as the arm moves overhead; the legs stay in their Warrior II position.
- Letting the front knee fall inward: Bring it back in line with the direction of your toes, rather than letting it turn toward the middle of the mat.
- Pushing hard on the back thigh: Rest the hand lightly, using it as a guide rather than making the arm carry your weight.
- Reaching down instead of up: Lift and lengthen your torso rather than trying to slide the lower hand as far down your leg as possible.
- Forcing your neck to look upward: Keep your gaze ahead if looking up is uncomfortable; the upward gaze is optional.
After making a change, pause before adjusting something else. Give yourself a moment to notice whether the position feels easier to hold.
You can also practise the setup without the overhead reach first. Think of that as learning the starting position, not as doing an incomplete version of the exercise.
Easier Ways to Practise
You don’t have to use the biggest version of the pose. Choose the option that lets you move without strain, and ask a qualified yoga teacher for help if you aren’t sure what to change.
Use Less Bend In Your Front Knee
A shallower knee bend and a slightly shorter stance can reduce the demand of the Warrior II starting position. Keep the knee pointing in the same direction as the front toes as you adjust.
Make the change before reaching overhead. That gives you one less thing to think about while holding the side stretch.
Make The Upper-Body Movement Smaller
Focus on lifting your arm and lengthening your side, with only a small lean. You do not need a deep backward reach to follow the pose’s main action.
Try leaving more space between what you can do and your limit. A practice does not have to take you to your furthest range every time.
Keep Your Gaze Ahead
Looking straight ahead is an accepted option in Reverse Warrior. There is no need to turn your head upward just to match a photograph.
Choose a comfortable place to rest your eyes. If you’re unsure about your balance, have a teacher help you choose a supported setup before practising alone.
Advanced Reverse Warrior: Is a Deeper Bend Better?
If you’re looking for an advanced reverse warrior variation, start by checking the basics rather than trying to lean farther. The same advice still applies: keep the legs steady and avoid turning the movement into a deep lower-back bend.
One option for experienced students is a half bind. Instead of resting the lower hand on the back leg, you bring that arm behind your back, with the hand resting around the lower back or reaching toward the opposite hip or thigh.
The word “bind” can sound complicated, but here it describes the arm wrapping behind the body. It does not mean you should force your hands together or pull yourself into a larger stretch.
A Cautious Way To Explore a Half Bind
Only try this with teacher guidance once the basic pose feels comfortable. Skip it if reaching behind your back causes pain or you have an unresolved shoulder problem.
- Set up the basic pose before changing your arm position.
- Keep the front knee bent and both feet steady.
- Bring the lower arm behind your back without forcing it.
- Let the hand rest where it reaches comfortably.
- Release the arm before returning upright.
You can stay with the basic pose for as long as you like. Treat the variation as an option, not a level you have to pass.
Safety Tips and When to Ask for Help
- Modify or avoid Reverse Warrior if you have a recent injury affecting your hips, knees, back, shoulders, or neck.
- If you are pregnant, recovering from surgery, or have balance or movement concerns, seek individual guidance before practising.
- Keep the side bend gentle and controlled. Do not force the movement or over-arch your lower back.
- Keep the bottom hand light on the back leg rather than using it to support your body weight.
- Looking up is optional. Keep your gaze forward if your neck feels uncomfortable.
- Stop if you experience sharp pain, dizziness, numbness, or unusual discomfort.
- If you have a medical condition or injury, consult a qualified healthcare professional before practising.
How to Fit the Reverse Warrior Pose into a Short Practice
Warrior II is a useful position to practise before Reverse Warrior because the legs stay in the same arrangement.
For a simple learning session, try the order below. Keep it slow rather than turning it into a fast flow.
- Begin standing comfortably and take a few natural breaths.
- Arrange your feet and arms for Warrior II.
- Move into a small Reverse Warrior.
- Return to Warrior II, then lower your arms.
- Step out carefully, pause, and change sides.
You can stop after one round on each side. If you repeat it, choose one thing to work on, such as a lighter lower hand or a more comfortable gaze.
Who Should Avoid Reverse Warrior Pose?
Most people can practise this pose safely. But it is not right for everyone, and there are days when it is better to skip it.
Skip this pose if you have:
- A neck injury — or practise without looking up
- A shoulder injury, especially in the arm you would lift
- A recent knee injury or knee surgery
- A hip injury or hip replacement
- A lower back injury or disc problem
- Vertigo or dizziness — the head position can make it worse
- High or low blood pressure — the raised arm can affect it
- A recent surgery of any kind, until your doctor clears you
Be careful and check with a teacher or doctor if you are:
- Pregnant — use a narrower stance, no deep lean, and work with a prenatal-trained teacher
- Recovering from an illness or injury and still feeling weak
- New to exercise after a long break
- Managing arthritis in the knees, hips or shoulders
- Prone to losing balance — practise near a wall
Stop immediately if you feel:
- Sharp or sudden pain anywhere
- A pinching feeling in the knee, hip or lower back
- Numbness or tingling in the arms or legs
- Dizziness or light-headedness
- Breathlessness or difficulty breathing normally
- Pain that stays after you come out of the pose
A simple rule to remember: a stretch feels long and slow. Pain feels sharp and sudden. If it is sharp, come out — every time.
If any symptom is severe, or does not settle within a day or two, speak to a doctor.
Also Read: 10 Easy Yoga Poses for Beginners: A Gentle Start to Your Practice
Final Thoughts
Learning one pose can leave you with more questions. How do you choose the right stance? When should you change a movement? And how do individual postures fit into a complete practice?
Reverse Warrior rewards patience more than flexibility. Keep the legs steady, reach up before you lean, and let the lower hand stay light. A smaller version done well is always better than a deep one done with a strained back or neck.
Start where you are today. The pose will meet you there.
If you’d like to learn asanas with proper guidance and correction, our 200 hour yoga teacher training in Rishikesh covers postures, pranayama, meditation, anatomy, and teaching methods.
Frequently Asked Questions
Can a complete beginner try Reverse Warrior?
Yes. It is considered a beginner-level pose. Beginners should use a narrower stance, bend the front knee less, and look forward instead of up.
How long should I hold it?
Three to five breaths per side, roughly 15 to 30 seconds. Come out earlier if you feel any strain — the hold is a guide, not a target.
Where should I feel the stretch?
Along the side of your torso and up through the raised arm. You should not feel it as a squeeze in your lower back.
Is Reverse Warrior a backbend or a side bend?
A side bend. Think “up and slightly over,” not “as far back as possible.” If it starts to feel like a backbend, ease out of it.
I searched for “reverse virabhadrasana” — is this the same pose?
Yes. Reverse Warrior, Viparita Virabhadrasana and Reverse Virabhadrasana all mean the same pose. Some studios also call it Peaceful Warrior.
Do I have to touch my calf with the lower hand?
No. Resting the hand on your back thigh is fine. Keep it light either way — reaching lower does not mean doing it better.
Should I practise both sides?
Yes, always. Come out of the first side, reset your feet, then repeat. The second side does not need to match the first exactly.

 +91-8433225327,
 Rishikul Yogshala Rishikesh, Narayan Kunj, Jonk Village, Ram Jhula, Swarg Ashram, Rishikesh, Uttarakhand 249304
 By Airway
 By Railway
 By Bus/Cabs