








Virabhadrasana 3 (Warrior 3 Pose): How to Do It, Benefits & Precautions
Table of Contents
- What Does Virabhadrasana 3 Mean?
- How to Prepare for Warrior 3?
- How to Do Warrior 3 Pose: Virabhadrasana 3 Steps
- Virabhadrasana 3 Alignment Tips
- Common Mistakes in Warrior 3 (and How to Fix Them)
- Warrior 3 Modifications and Variations
- Virabhadrasana 3 Benefits
- Who Should Avoid Warrior 3? (Virabhadrasana 3 Contraindications)
- Virabhadrasana 1, 2, 3: Warrior 1 vs Warrior 2 vs Warrior 3
- Learn Warrior 3 With Hands-On Guidance in Rishikesh
- Frequently Asked Questions
- What is Warrior 3 called in Sanskrit?
- Is Warrior 3 good for beginners?
- How long should I hold Warrior 3?
- What muscles does Warrior 3 work?
- Why is Warrior 3 so hard?
- Is Warrior 3 an Ashtanga pose?
- What is the difference between Warrior 1, 2, and 3?
- What are the benefits of Virabhadrasana 3?
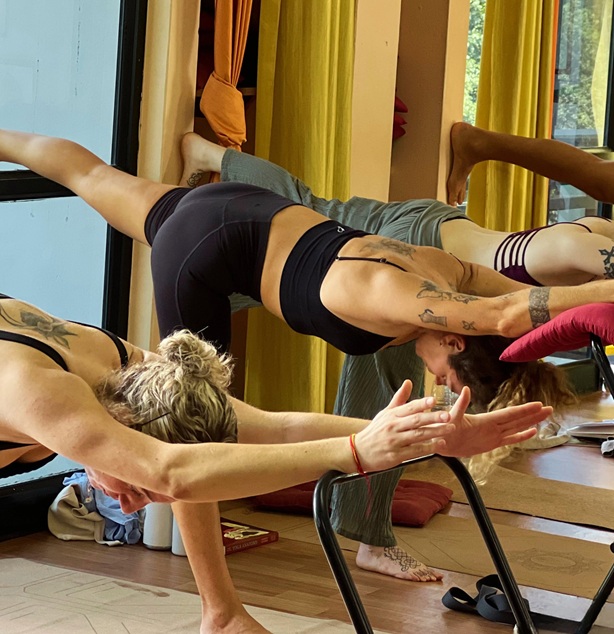
Virabhadrasana 3, or Warrior 3, is the balancing pose of the Warrior family. You stand on one leg, lift the other leg behind you, and lean forward until your body makes one long line, like the letter T. It looks simple in photos. The first time you try it, you may shake a little, and that’s completely normal.
We teach this pose to students from all over the world in our teacher training courses here in Rishikesh. In this guide, we’ll show you how to do it safely, step by step, with easy versions for beginners and the mistakes we see most often.
Warrior 3 pose (Virabhadrasana 3) is a standing balance pose where you balance on one leg, with your body and lifted leg parallel to the floor. It strengthens the legs, glutes, back, and core, and it trains balance and focus. It’s usually taught as an intermediate pose, but beginners can practice it with blocks, a chair, or a wall.
Warrior 3 at a Glance
| Sanskrit name | Virabhadrasana 3 (also written Virabhadrasana III or Veerbhadrasana 3; Hindi: वीरभद्रासन 3) |
| English name | Warrior 3, Warrior III pose, Warrior Three pose, or Warrior pose 3 |
| Pronunciation | veer-uh-buh-DRAHS-uh-nuh |
| Pose type | Standing balance |
| Level | Intermediate (beginner-friendly with props) |
| Main muscles | Glutes, hamstrings, quadriceps, back muscles, core |
| Gaze (drishti) | The floor, about one meter in front of you |
| How long to hold | 3 to 5 breaths to start, building up to 8 breaths |
| Yoga styles | Hatha, Vinyasa, Iyengar |
What Does Virabhadrasana 3 Mean?
The Sanskrit name has three parts. Vira means hero or warrior, bhadra means auspicious or good, and asana means pose.
The name comes from Virabhadra, a fierce warrior in Hindu mythology. According to the story, Lord Shiva created him from a lock of his hair after the death of his wife, Sati. In a popular modern telling, the three Warrior poses show three moments of Virabhadra’s story. Warrior 1 is him rising up, Warrior 2 is him fixing his eyes on his target, and Warrior 3 is him moving forward with speed and focus.
In our classes, we explain it a little differently. The warrior in yoga isn’t fighting other people. He’s fighting our inner enemies: ego, fear, and a restless mind. When you balance in Warrior 3, you can’t think about ten things at once. You have to be right here.
How to Prepare for Warrior 3?
Warrior 3 asks for three things: strong legs, a strong back, and good balance. If you’re new to it, spend a week or two practicing these poses first:
- Tadasana (Mountain Pose): teaches you to stand evenly on both feet.
- Vrikshasana (Tree Pose): your first one-legged balance.
- Warrior 1 and High Lunge: build strength in the legs and hips.
- Parsvottanasana (Pyramid Pose): stretches the hamstrings, which helps you hinge forward.
- Shalabhasana (Locust Pose): strengthens the back muscles that hold your chest up in Warrior 3.
A simple warm-up of a few rounds of Surya Namaskar (Sun Salutation) before you start will also help your body feel ready.
How to Do Warrior 3 Pose: Virabhadrasana 3 Steps
- Stand with your feet hip-width apart and place your hands on your hips.
- Move your weight into your right foot. Spread your toes and press evenly through the whole foot. Keep a tiny bend in your right knee so it doesn’t lock.
- Take a small step back with your left foot and rest the toes lightly on the floor, like a kickstand.
- Keeping your back long, lean your chest forward from the hips. At the same time, let your left leg lift off the floor behind you.
- Keep going until your chest and your left leg are about parallel to the floor. If you can’t go that far, stop wherever you can keep your back straight. A straight line is more important than height.
- Your left hip will want to roll open toward the ceiling. Gently turn it down so both hip bones face the floor. Point your left toes straight down and press your heel back, as if pushing into a wall.
- Keep your hands on your hips, bring them to prayer at your chest, stretch them back beside your body, or reach them forward alongside your ears.
- Look at a fixed spot on the floor about one meter in front of you. Keep your neck in line with your spine.
- Stay for 3 to 5 slow breaths. Keep the breath smooth. If you notice you’re holding it, come out and try again.
- Bend your standing knee a little, lower your left foot to the floor, and come back up to standing. Rest for a breath, then repeat on the other side.
Teacher’s tip: Many students try to lift the back leg first and then lean forward. It works much better the other way around. Think of your body as a seesaw: as your chest moves forward, your leg rises by itself.
Virabhadrasana 3 Alignment Tips
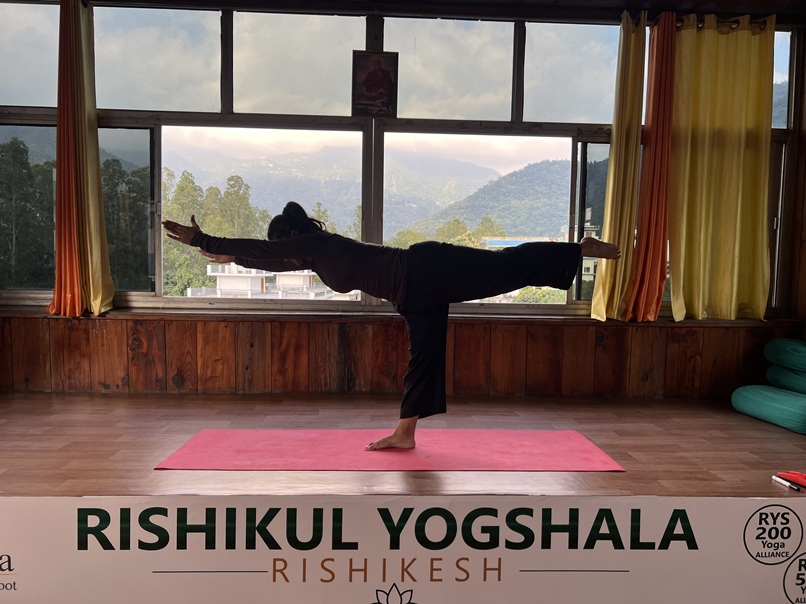
- Hips level: both hip bones face the floor, at the same height.
- Standing leg: long and strong, with a slight bend so the knee is never locked.
- Standing foot: weight spread across the heel, big toe, and little toe.
- Back leg: active, with the toes pointing down and the heel pushing back.
- One line: from your fingertips (or the crown of your head) to your back heel.
- Neck: long and relaxed, not looking up.
Common Mistakes in Warrior 3 (and How to Fix Them)
These are the mistakes we correct most often during our yoga teacher training in Rishikesh:
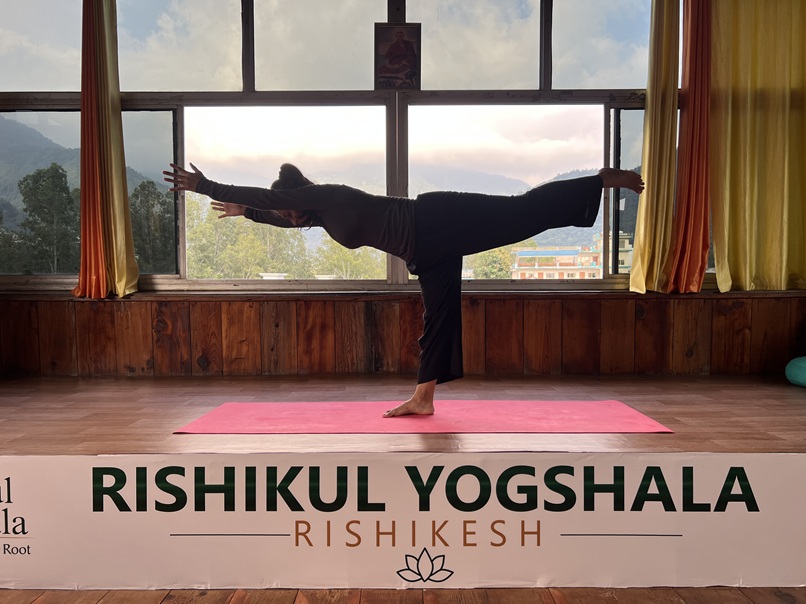
1. The hip of the lifted leg opens up. This is the most common one. The leg looks higher, but the pose is twisted.
Fix: Turn the lifted leg’s toes to point at the floor and roll that hip down.
2. The chest drops and the back rounds. This usually happens when the back muscles are weak or the hamstrings are tight.
Fix: Put your hands on blocks or a chair, and lift your chest before lifting your leg.
3. The standing knee locks. This puts pressure on the back of the knee.
Fix: Keep a micro-bend in the standing leg.
4. Looking forward instead of down. This crunches the back of the neck.
Fix: Keep your gaze on the floor ahead of you.
5. Holding your breath. You’ll lose balance faster.
Fix: Breathe slowly through your nose. If you can’t breathe calmly, use a support.
Warrior 3 Modifications and Variations
You don’t need perfect balance to practice Warrior 3. These Virabhadrasana 3 variations let you build up to the full pose:
- Hands on blocks: Place two blocks under your shoulders at the highest height. This takes the pressure off your balance so you can focus on alignment.
- Hands on a chair: Great for beginners, older students, and anyone with tight hamstrings. Rest your hands on the back of a chair and step back into the pose.
- Back foot on a wall: Stand facing away from a wall and press your lifted foot into it. This is the best way to learn level hips, because you can feel if your hip rolls open.
- Hands on hips: A good middle step before taking your arms forward.
- Arms forward (full pose): Stretch your arms forward beside your ears with the palms facing each other or joined. This is the classic version taught in the Iyengar tradition, and it’s the hardest, because your body becomes one long lever.
Virabhadrasana 3 Benefits
Here are the main benefits of Virabhadrasana 3, also known as Warrior 3 pose benefits, that you can expect with regular practice:
1. Strengthens the legs and glutes. Your standing leg works hard to hold your whole body, and the glutes on both sides stay switched on.
2. Builds a stronger back and core. Holding your chest up and parallel to the floor strengthens the muscles along your spine and your deep core muscles, which support good posture in daily life.
3. Improves balance and stability. Balancing on one leg trains the small muscles of your foot and ankle. It also improves your sense of where your body is in space.
4. Trains focus. You can’t hold Warrior 3 while your mind is wandering. Many of our students find this is the pose that teaches them the most about concentration.
5. Stretches the back of the standing leg. As you hinge forward, the hamstrings of the standing leg get a gentle stretch.
6. Builds stamina. Holding the pose for several breaths builds muscular endurance, especially when you link it with other standing poses in a sequence.
7. Prepares you for other poses. The strength and balance you build here help with poses like Ardha Chandrasana (Half Moon) and Standing Splits.
Who Should Avoid Warrior 3? (Virabhadrasana 3 Contraindications)
Warrior 3 is safe for most healthy people when done with care. But please avoid it, or practice only with support and a teacher’s guidance, if you have:
- A recent injury to the ankle, knee, hip, or hamstring.
- Lower back pain or a back condition: use blocks or a chair and keep your core engaged. Stop if you feel pain.
- Uncontrolled high blood pressure or a heart condition: keep holds short, use a support, and never hold your breath. Check with your doctor first.
- Dizziness, vertigo, or low blood pressure: practice next to a wall or with a chair.
- Pregnancy: in later stages, balance changes, so use a wall or chair, or skip the pose. Talk to your doctor or a prenatal yoga teacher.
If you have any health condition, speak to your doctor before starting a new yoga practice.
Virabhadrasana 1, 2, 3: Warrior 1 vs Warrior 2 vs Warrior 3
| Warrior 1 | Warrior 2 | Warrior 3 | |
|---|---|---|---|
| Stance | Lunge, hips facing forward | Wide stance, hips facing sideways | Balancing on one leg |
| Arms | Overhead | Out to the sides | Forward, back, or at the chest |
| Main focus | Leg strength, hip opening | Stamina, hip opening | Balance, back and core strength |
| Difficulty | Beginner | Beginner | Intermediate |
To learn the full series, read our guide to Virabhadrasana (Warrior Pose): Steps, Benefits & Variations and our Warrior 2 pose guide.
Learn Warrior 3 With Hands-On Guidance in Rishikesh
Warrior 3 pose isn’t about how high you can lift your leg. It’s about keeping your hips level, your back long, and your breath calm while you balance on one foot. If you wobble, use a block. If you fall, laugh and try again. Every student who holds this pose with ease today was once standing exactly where you are now.
Start with the modifications, practice a few breaths on each side, and be patient with yourself. Within a few weeks, you’ll notice stronger legs, a steadier core, and a mind that settles more quickly.
But there’s one thing a blog can’t do: watch you practice. Photos and videos show you the shape of Virabhadrasana 3, but they can’t tell you that your left hip is rolling open or that your standing knee is locked. A teacher in the room can.
That’s exactly what we do every day at Rishikul Yogshala Rishikesh. In our 200 Hour Yoga Teacher Training in Rishikesh, you’ll practice standing poses like Warrior 3 in daily Hatha classes and dedicated alignment sessions, with hands-on adjustments from teachers who have been guiding students since 2010. You’ll also learn how to teach these poses safely to others, including how to modify them for beginners and students with injuries.
Frequently Asked Questions
What is Warrior 3 called in Sanskrit?
Warrior 3 is called Virabhadrasana 3 (or Virabhadrasana III) in Sanskrit. It’s named after Virabhadra, a warrior from Hindu mythology.
Is Warrior 3 good for beginners?
Yes, with support. Beginners can start with their hands on blocks or a chair, or with the back foot against a wall, and slowly work toward the full pose.
How long should I hold Warrior 3?
Start with 3 to 5 slow breaths on each side. As you get stronger, you can build up to around 8 breaths. Always keep your breath smooth.
What muscles does Warrior 3 work?
Warrior 3 mainly works the glutes, hamstrings, and quadriceps of the standing leg, the glutes and hamstrings of the lifted leg, the back muscles along the spine, and the core. With arms forward, the shoulders work too.
Why is Warrior 3 so hard?
Warrior 3 is hard because you balance on one leg while holding your body parallel to the floor. That needs strong legs, strong back muscles, and flexible hamstrings at the same time. Using props makes it much easier while you build strength.
Is Warrior 3 an Ashtanga pose?
No. Warrior 3 isn’t part of the traditional Ashtanga Primary Series or classical Surya Namaskar. It’s commonly taught in Hatha, Vinyasa, and Iyengar yoga.
What is the difference between Warrior 1, 2, and 3?
Warrior 1 is a lunge with the hips facing forward and arms overhead. Warrior 2 is a wide stance with the hips facing sideways and arms stretched out. Warrior 3 is a one-legged balance with the body parallel to the floor.
What are the benefits of Virabhadrasana 3?
The main benefits of Virabhadrasana 3 are stronger legs, glutes, back, and core, better balance and ankle stability, improved focus, and a gentle hamstring stretch in the standing leg.
This article is for general information and is not medical advice. If you have a respiratory or heart condition, are pregnant, or are unsure whether these practices suit you, please speak to your doctor before beginning.

 +91-8433225327,
 Rishikul Yogshala Rishikesh, Narayan Kunj, Jonk Village, Ram Jhula, Swarg Ashram, Rishikesh, Uttarakhand 249304
 By Airway
 By Railway
 By Bus/Cabs