








Parsvottanasana (Pyramid Pose): A Gentle Guide to Steps, Benefits, and Modifications
Table of Contents
- What is Parsvottanasana?
- Parsvottanasana at a Glance
- Preparatory Poses
- How to do Parsvottanasana?
- Getting the Hips Square
- Reverse Prayer: A Step-by-Step Progression
- Variations of Parsvottanasana
- Props and Modifications
- Common Mistakes
- Which Muscles Are Working?
- Benefits of Parsvottanasana
- Counter Poses
- Parsvottanasana vs Trikonasana vs Uttanasana
- Parsvottanasana Contraindications
- Conclusion
- FAQs
- What is Parsvottanasana good for?
- How long should you hold Pyramid Pose?
- Why can’t I straighten my front leg in Pyramid Pose?
- Is Parsvottanasana a hip opener?
- What is the difference between Parsvottanasana and Trikonasana?
- Can beginners do reverse prayer?
- Who should not do Pyramid Pose?
- Is Pyramid Pose the same as Intense Side Stretch Pose?
Parsvottanasana looks simple from the outside: one leg forward, fold over it. Then you try it and discover your hamstrings have opinions, your back hip keeps swinging open, and your hands will not meet behind your back no matter how politely you ask.
It’s a pose worth being patient with. Practised well, it does more for your posture and your standing balance than almost anything else in the standing sequence.
This guide covers the steps, the alignment most people get wrong, the modifications that actually help, and how to work towards reverse prayer without hurting your shoulders.
What is Parsvottanasana?
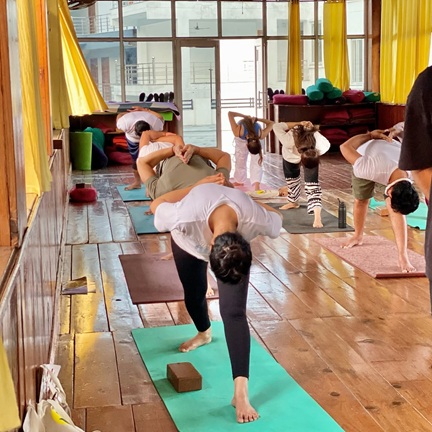
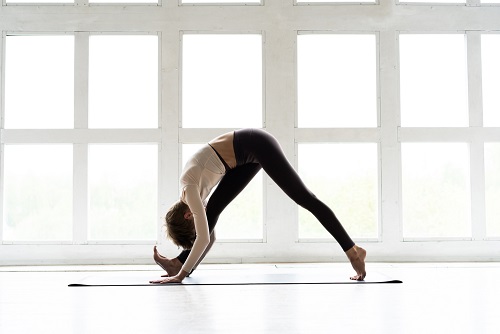
Parsvottanasana is a standing forward bend in which you step one foot back, square your hips to the front, and fold over the front leg with a long spine. The hands usually meet in reverse prayer behind the back. It mainly stretches the hamstrings and calves while building balance and concentration.
The name comes from Sanskrit: Parsva means side, Ut means intense, Tan means stretch, and Asana means pose. Together they give “intense side stretch pose,” which describes exactly what the body is doing — folding forward and slightly to one side for a deep stretch. In English it is known as both Pyramid Pose and Intense Side Stretch Pose.
The pose plays a vital role in Ashtanga Yoga and is equally emphasized in Hatha and Iyengar styles. It appears in the standing sequence of the Ashtanga Primary Series, and B.K.S. Iyengar gives it detailed treatment in Light on Yoga.
Teachers often use it as a warm-up before deeper forward bends, because it opens tight hamstrings and lengthens the spine without demanding much flexibility to begin with.
Parsvottanasana at a Glance
| Sanskrit name | Parsvottanasana (पार्श्वोत्तानासन) |
| English names | Pyramid Pose, Intense Side Stretch Pose |
| Pose type | Standing forward bend, balancing pose |
| Level | Beginner to intermediate |
| How long to hold | 20 to 30 seconds, or 5 slow breaths, each side |
| How often | 2 to 3 rounds per side, 3 to 4 times a week |
| Main areas worked | Hamstrings, calves, hips, spine, shoulders, wrists |
| Best time | Morning practice, or as a warm-up before deeper forward bends |
| Avoid if | Late pregnancy, uncontrolled high blood pressure, back or shoulder injury, vertigo |
Preparatory Poses
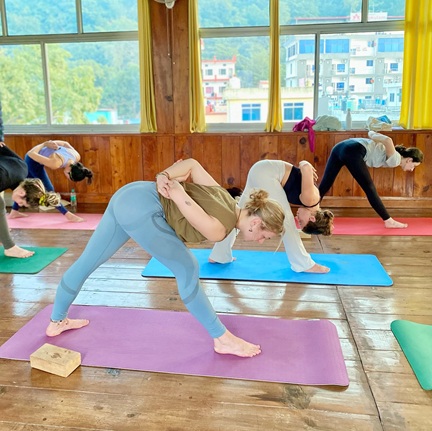
1. Sun Salutation (Surya Namaskar): One famous yoga asana is Sun Salutation, which you can use to warm up the muscles and lengthen the spine before practising this stretch pose. You can do about 6 rounds or even more, depending on your body’s needs.
2. Tree Pose: Parsvottanasana needs good balance because bending forward can make you feel dizzy. Practicing Tree Pose first can help you build the balance you need.
- Stand tall in Tadasana and shift your weight onto the left foot.
- Gently open the right knee to the side and place the sole of the right foot on the inner left calf or inner thigh — never on the knee itself.
- Lift your arms overhead, join your palms in Namaste, and stretch your upper body upward while keeping your balance.
- Hold for around 6 breaths, stretching upward a little more with each exhale.
- Now slowly lower your leg to the mat and do the same on the other side, keeping your hips facing forward.
3. Prasarita Padottanasana: Spreading the legs in this pose helps to open up the hips and makes it easier to balance the body.
- Stand with your feet wide apart, about 3 to 4 feet, with the outer edges of the feet parallel and pressing firmly into the ground.
- Lengthen your back starting from the hips, take a deep breath in, and slowly lower your upper body forward as you breathe out.
- Extend your body towards the floor, aiming to bring the top of your head down. Place your palms on the floor under your shoulders for support.
- Hold the position for about 6 breaths.
How to do Parsvottanasana?
Here are the steps you need to follow to perform Parsvottanasana correctly:
- Begin this pose by standing in Tadasana (Mountain Pose).
- Your feet are grounded, and your legs are active.
- Bring the left foot 2 to 3 feet behind the right foot and proceed into the pyramid pose.
- Turn the back foot in about 45 to 60 degrees and press the outer edge of that heel down. This is what gives you your base.
- Move your arms behind your back and create the Namaste (prayer) position. If that isn’t available, hold opposite elbows or rest your hands on your hips.
- Square both hips towards the front of the mat. Draw the right hip back and the left hip forward until they feel level.
- As you inhale, lengthen your spine. As you exhale, hinge from the hips and fold forward over the right leg.
- Keep the spine long. The moment your lower back begins to round, stop and stay there — that is your full pose for today.
- Hold this position for 3 to 5 deep breaths, roughly 20 to 30 seconds.
- Inhale to lift the torso, smoothly release the stance and come back to Tadasana.
- Repeat the same procedure with the other leg.
Getting the Hips Square
This is the part of the pose almost everybody gets wrong, and it is worth slowing down for.
Because one leg is in front of the other, the back hip naturally wants to swing open towards the side of the mat. When it does, the fold gets easier and looks deeper — but you are no longer stretching the hamstring the way the pose intends, and the lower back takes the load instead.
Here is a simple way to check. Place both hands on the front points of your hips before you fold. They should be facing the short edge of the mat, level with each other, like two headlights pointing straight ahead. If the back one is drifting outward, draw it forward and pull the front hip back.
Two things usually help. First, shorten your stance — most people stand too long. Second, widen your feet slightly so they are not on a tightrope; leave a few inches of space between the front foot line and the back foot line.
In our yoga teacher training courses, this is the correction we give more than any other in this pose. Students arrive worrying about their hamstrings and leave realising the problem was their hips all along.
Reverse Prayer: A Step-by-Step Progression
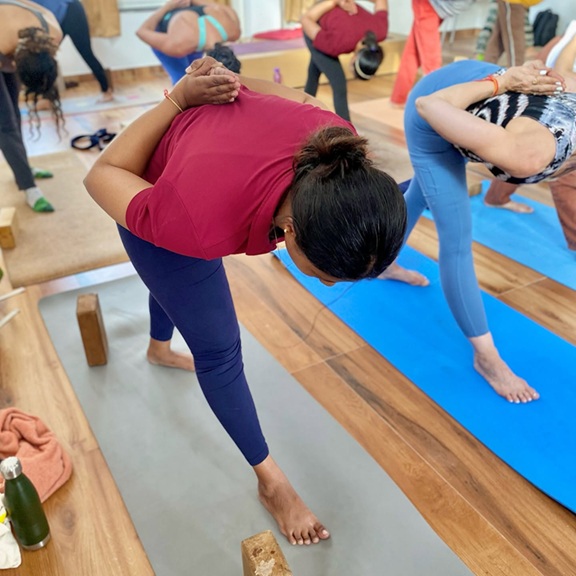
Reverse prayer, or Paschima Namaskarasana, is beautiful, but it demands a lot of shoulder and wrist mobility. Very few beginners can do it, and forcing it is a fast way to irritate a shoulder.
Work through these in order and stay at whichever one you can hold comfortably while still breathing well:
- Hands on the hips. The most stable option and completely valid.
- Hold opposite elbows behind the back. Opens the chest without asking anything of the wrists.
- Clasp the wrists or forearms behind the back.
- Fingertips together behind the back, pointing down.
- Fingertips together, pointing up towards the spine.
- Full reverse prayer — palms flat, thumbs against the spine.
Move to the next stage only when the current one feels easy on both sides. Most people find one shoulder is noticeably tighter than the other, and that is normal.
Also Read – Pranamasana Yoga Pose (Prayer Pose): Step-by-Step Instructions, Variations & Benefits
Variations of Parsvottanasana
Parsvottanasana is a versatile yoga pose with both easy variations and advanced versions. Both types are mentioned separately here for better understanding.
Easy Variations
- Struggling with the prayer pose? Modify by grabbing each elbow with the opposite hand behind your back.
- Hands on the hips is a great option if you need a little extra steadiness.
- Ardha Parsvottanasana — stop halfway, with the torso parallel to the floor and hands on a wall or chair. This is the version to use if you have high blood pressure or feel light-headed when you fold.
Advanced Variations
- For this variation, stretch your arms up and keep them close to your ears.
- Add a balance boost by coming onto the toes of your back foot.
- Lift your arms sideways, keeping the elbows at a 90-degree angle. Inhale and engage your upper back by bringing the shoulder blades closer. This movement targets and strengthens the muscles along your back.
Parsvottanasana works many muscles in your body and helps you relax by encouraging the parasympathetic nervous system. It is good for both your posture and your mind.
Props and Modifications
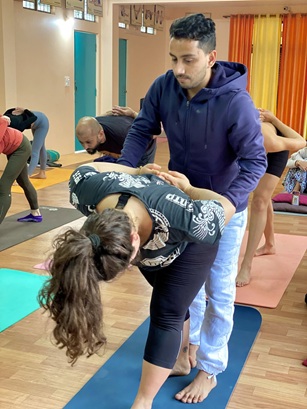
Props are not a downgrade. They let you hold the correct shape instead of a collapsed version of a harder one.
- Two blocks under the hands. The most useful modification in this pose by a wide margin. Set a block on either side of the front foot at whatever height lets your spine stay long. Almost everyone with tight hamstrings should be using these.
- A chair under the hands. Higher than blocks, and ideal for beginners, larger bodies, or anyone with lower back sensitivity.
- Back heel to a wall. Solves the balance problem instantly and lets you concentrate on the hips.
- A folded blanket under the back heel. If that heel does not reach the floor, this stops the ankle from fighting you.
- Softly bent front knee. A micro-bend takes the pull off the hamstring attachment and lets the hips square more easily. Straightening the leg is not the goal of this pose.
Common Mistakes
- The back hip swings open. By far the most common. Covered in detail above — shorten the stance and widen the feet.
- Rounding the spine to get lower. The measure of this pose is a long spine, not a low head. If your back is rounding, you have gone past your range. Come up, use blocks, and stay higher.
- Locking the front knee. Hyperextending pushes stress into the knee joint and the hamstring attachment. Keep a very slight bend and the muscles engaged.
- Forcing reverse prayer. If your shoulders round forward and your chest closes to make the hands meet, you have lost more than you gained. Hold the elbows instead.
- The back heel lifting. That heel is your anchor. If it keeps peeling off the mat, your stance is too long.
- Holding the breath. People often stop breathing in the deepest part of the fold. If you can’t breathe smoothly, you are too deep.
Which Muscles Are Working?
Knowing what is actually happening makes the pose easier to feel.
Lengthening: hamstrings and calf muscles of the front leg, the gluteus maximus on that side, the erector spinae along the back, and the chest and front shoulder if you are in reverse prayer.
Working to hold you there: quadriceps of both legs, the muscles around the standing ankles, the deep core, and the rhomboids and mid-back drawing the shoulder blades together.
The balance demand comes from the narrow front-to-back base. That is also why this pose sharpens focus so quickly — the body has no choice but to pay attention.
Benefits of Parsvottanasana
Physical Benefits of Parsvottanasana
- Stretches the hamstrings and calves: This asana is known for stretching the hamstrings and calf area, helping to improve flexibility over time.
- Builds leg strength: Both legs stay active throughout, which strengthens the quadriceps and the muscles supporting the knees and ankles.
- Spinal Extension and Strengthening: In Pyramid Pose, folding forward with a long spine helps lengthen and strengthen the back, encouraging better posture and alignment.
- Improves hip awareness: The squaring action teaches you to feel where your pelvis actually is — useful in almost every standing pose that follows.
- Energising and Invigorating: The forward fold with active legs leaves most people feeling awake rather than tired.
- Mobilising Shoulders and Wrists: In this pose, the reverse prayer position works the shoulders and wrists, encouraging greater range of motion and flexibility.
Mental Benefits
- Stress Relief: Parsvottanasana needs steady attention on the breath, and holding that attention for a few slow breaths settles the nervous system.
- Improved Balance and Focus: The pose’s one-sided structure challenges balance and sharpens concentration, deepening the connection between body and mind.
- Therapeutic Benefits: Practised gently and with support, this pose helps relieve everyday stiffness and fatigue.
- Preparation for Other Asanas: This asana is a valuable preparatory pose that helps fine-tune alignment and build the foundation for more advanced forward and back bends.
Also Read – Monkeying Around: The Physical and Mental Benefits of Hanuman Pose
Counter Poses
After both sides, give the body something in the opposite direction:
- Adho Mukha Svanasana (Downward Dog) to even out both legs.
- A gentle backbend — Bhujangasana or a standing chest opener — to answer the forward fold.
- Malasana or a simple squat if the hips feel tight afterwards.
- Tadasana for a few breaths, simply noticing how the legs feel now.
Parsvottanasana vs Trikonasana vs Uttanasana
These three get confused often, so here is the short version.
- Parsvottanasana has the hips squared to the front and folds forward over one leg. The stretch lands mainly in the hamstring of the front leg.
- Trikonasana (Triangle Pose) has the hips open to the side and bends sideways, not forward. The stretch runs along the side body and inner thigh.
- Uttanasana (Standing Forward Bend) has both feet together and folds over both legs at once. Both hamstrings work equally.
A simple way to remember it: Parsvottanasana is one leg at a time with square hips, Trikonasana is sideways with open hips, Uttanasana is both legs together.
Parsvottanasana Contraindications
- If you have a back or shoulder injury, modify the pose by gently holding each elbow with the opposite hand behind your back instead of attempting the reverse prayer position. Or, you can choose another option to place your hands on your hips.
- Avoid locking your knee joints throughout the practice. If you feel excessive tension in your hamstrings, you can slightly bend your knees.
- Pregnant women who are in their later stages should avoid this asana for safety and comfort. In earlier stages, practise the Ardha version with hands on a wall and a wider stance.
- Since this is a balancing posture, keep your gaze steady and eyes open in the final position to help with stability and concentration.
- If you have high blood pressure, you can try Ardha Parsvottanasana, a variation in which your torso stays parallel to the floor. This pose is similar to Parsvottanasana but with added support.
- If you experience vertigo or feel light-headed when your head goes below your heart, stay in the half version and come up slowly on an inhale.
- With a recent hamstring strain, keep the front knee bent and the fold shallow until the pain has fully settled.
Conclusion
Whether you seek to strengthen your body, align your energies, or want the best warm-up yoga pose, Parsvottanasana is a strong technique for experiencing all this. The benefit of this yoga pose is that it goes beyond physical strength and supports mental clarity.
However, it’s important to remember that the effects of Pyramid Pose can vary from person to person, and its benefits depend on how regularly, consistently, and sincerely you practise it.
If you want to learn poses like this properly, with hands-on correction rather than guesswork, consider studying with us in Rishikesh. Rishikul Yogshala offers yoga teacher training in India, where standing poses like Parsvottanasana are taught in detail from the ground up.
FAQs
What is Parsvottanasana good for?
It stretches the hamstrings and calves, strengthens the legs, lengthens the spine, and opens the shoulders. It also builds balance and concentration, which is why it is often used as a warm-up before deeper forward bends.
How long should you hold Pyramid Pose?
Around 20 to 30 seconds, or 5 slow breaths, on each side. Two to three rounds per side is plenty. Stop sooner if your breathing becomes uneven.
Why can’t I straighten my front leg in Pyramid Pose?
Usually tight hamstrings, but often it is because you are folding too deep too soon. Come up higher, put a block under each hand, and keep a small bend in the knee. The leg straightens over weeks, not in one session.
Is Parsvottanasana a hip opener?
Not really. It is a hamstring and calf stretch with a hip-squaring demand. The hips work hard in this pose, but they are working to stay level rather than to open outwards.
What is the difference between Parsvottanasana and Trikonasana?
Parsvottanasana squares the hips to the front and folds forward. Trikonasana keeps the hips open to the side and bends sideways. Different direction, different muscles.
Can beginners do reverse prayer?
Most cannot at first, and that is completely normal. Start with hands on the hips or holding opposite elbows. Reverse prayer needs shoulder and wrist mobility that builds gradually.
Who should not do Pyramid Pose?
Anyone in late pregnancy, with uncontrolled high blood pressure, vertigo, or a recent back, shoulder or hamstring injury. Several of these can practise the half version safely instead — check with your teacher.
Is Pyramid Pose the same as Intense Side Stretch Pose?
Yes. Both are English names for Parsvottanasana. “Intense Side Stretch” is the literal translation of the Sanskrit; “Pyramid Pose” describes the shape the legs and torso make.
This article is for general information and is not medical advice. If you have a respiratory or heart condition, are pregnant, or are unsure whether these practices suit you, please speak to your doctor before beginning.

 +91-8433225327,
 Rishikul Yogshala Rishikesh, Narayan Kunj, Jonk Village, Ram Jhula, Swarg Ashram, Rishikesh, Uttarakhand 249304
 By Airway
 By Railway
 By Bus/Cabs